Creating an Inference Request Component for Endpoint Testing
Introduction
Rather than manually testing your deployed endpoint, you can create a dedicated Kubeflow component that automatically sends test requests to your model serving endpoint and captures the predictions. This component integrates seamlessly into your pipeline, allowing you to validate your endpoint's functionality as part of the automated workflow. By including this component in your pipeline, you can verify that predictions are being generated correctly and inspect the results directly from the pipeline logs.
Overview
The inference request component:
- Sends data to your deployed model endpoint
- Retrieves predictions from the model
- Captures and formats the response
- Returns both endpoint information and prediction results
- Allows inspection of results through the pipeline UI
The Inference Request Component
Creating inference_request.py
This component handles the communication with your model serving endpoint:
Click to expand Python code
import json
import logging
import os
from collections import namedtuple
from json import dumps
from typing import NamedTuple

from caip_sdk.cli.app import caip
from kfp.components import func_to_container_op
from requests import post

from ml_pipeline.components.utils import pipeline_logging_config

logging.basicConfig(level=logging.INFO)


@pipeline_logging_config
def inference_request(
    inputs: dict,
    model_name: str,
    namespace: str,
) -> NamedTuple("ModelServing", [("endpoint_info", str), ("predictions", dict)]):
    # Define the inference endpoint URL
    inference_endpoint = f"http://{model_name}.{namespace}.svc.cluster.local/v1/models/{model_name}:predict"

    logging.info("Sending %s at %s", inputs, inference_endpoint)

    # Send a POST request to the endpoint
    inference_response = post(url=inference_endpoint, data=dumps(inputs))
    predictions = inference_response.json()  # Extract the JSON response

    if inference_response.status_code != 200:
        raise RuntimeError(predictions)

    # Format the response from the endpoint
    response = namedtuple("ModelServing", ["endpoint_info", "predictions"])
    return response(inference_endpoint, predictions)


inference_request_op = func_to_container_op(
    func=inference_request,
    use_code_pickling=True,
    modules_to_capture=[
        "ml_pipeline.components.inference_request",
        "ml_pipeline.components.utils",
    ],
    base_image=caip.cd4ml_config.get_python_base_image(),
    packages_to_install=[
        "cloudpickle",
        "fsspec",
        "requests",
    ],
)
Component Explanation
inference_endpoint: Constructs the URL to your model serving endpoint using Kubernetes service discoveryinference_response: Sends a POST request with your input data- Response handling: Extracts JSON predictions and validates the HTTP status code
- Return value: Returns both the endpoint URL and prediction results as a named tuple
Adding the Component to Your Pipeline
Import the Component
from ml_pipeline.components.inference_request import inference_request_op

# ...rest of the code
Add the Inference Step to Your Pipeline
Insert the following code within your pipeline definition (typically after your model deployment step):
# ... condition wrapper
# ... rest of the pipeline

inference_step = inference_request_op(
    inputs=inputs,
    model_name=model_name,
    namespace=profile,
)

inference_step.set_display_name("Send Inference Request")
set_max_cache_staleness(inference_step)
inference_step.after(deploy_inference_service_step)
Configuration Details
inputs: The data dictionary to send to the model (we'll create this in the next section)model_name: The name of your deployed modelnamespace: The Kubernetes namespace where your model is deployedset_display_name(): Sets a readable name for the step in the pipeline UIafter(): Ensures the inference step runs only after the model is successfully deployed
Next steps: In the second half of this guide, we'll create the request.json file with sample data and show you how to view the prediction results in the pipeline UI.
Creating Test Data and Viewing Results
Creating the Request Data File
Step 1: Create request.json
Create a new file called request.json in your project to store the test data you'll send to your model endpoint. The format of this file should match your model's expected input format.
{
  "instances": [
    [1.0, 2.5, 3.2, 0.8],
    [2.1, 1.5, 2.8, 1.2],
    [0.5, 3.1, 1.9, 0.3],
    [3.2, 0.9, 2.5, 1.8],
    [1.8, 2.3, 0.7, 2.1]
  ]
}
Sample Data Guidelines
- Ensure the data format matches your model's input specification
- Include multiple samples to test batch processing
- Use realistic values within the expected ranges for your use case
- Adjust feature dimensions to match your trained model's input shape
Expected Output Format
When your inference step executes successfully, the predictions will be returned in a structured format similar to:
{
  "predictions": [
    [1.0248082876205444, 0.4639773964881897, -0.0009376775124110281],
    [0.25180068612098694, 0.8002504706382751, 0.1016969233751297],
    [0.8937419056892395, 0.02512218803167343, 0.09538192301988602],
    [0.19670623540878296, 0.0091044120490551, 0.7712355852127075],
    [0.11391223967075348, 0.004904694855213165, 0.7690905928611755]
  ]
}
Each prediction corresponds to the corresponding input sample in your request.
Viewing Inference Results in the Pipeline UI
Step 1: Locate the Inference Step
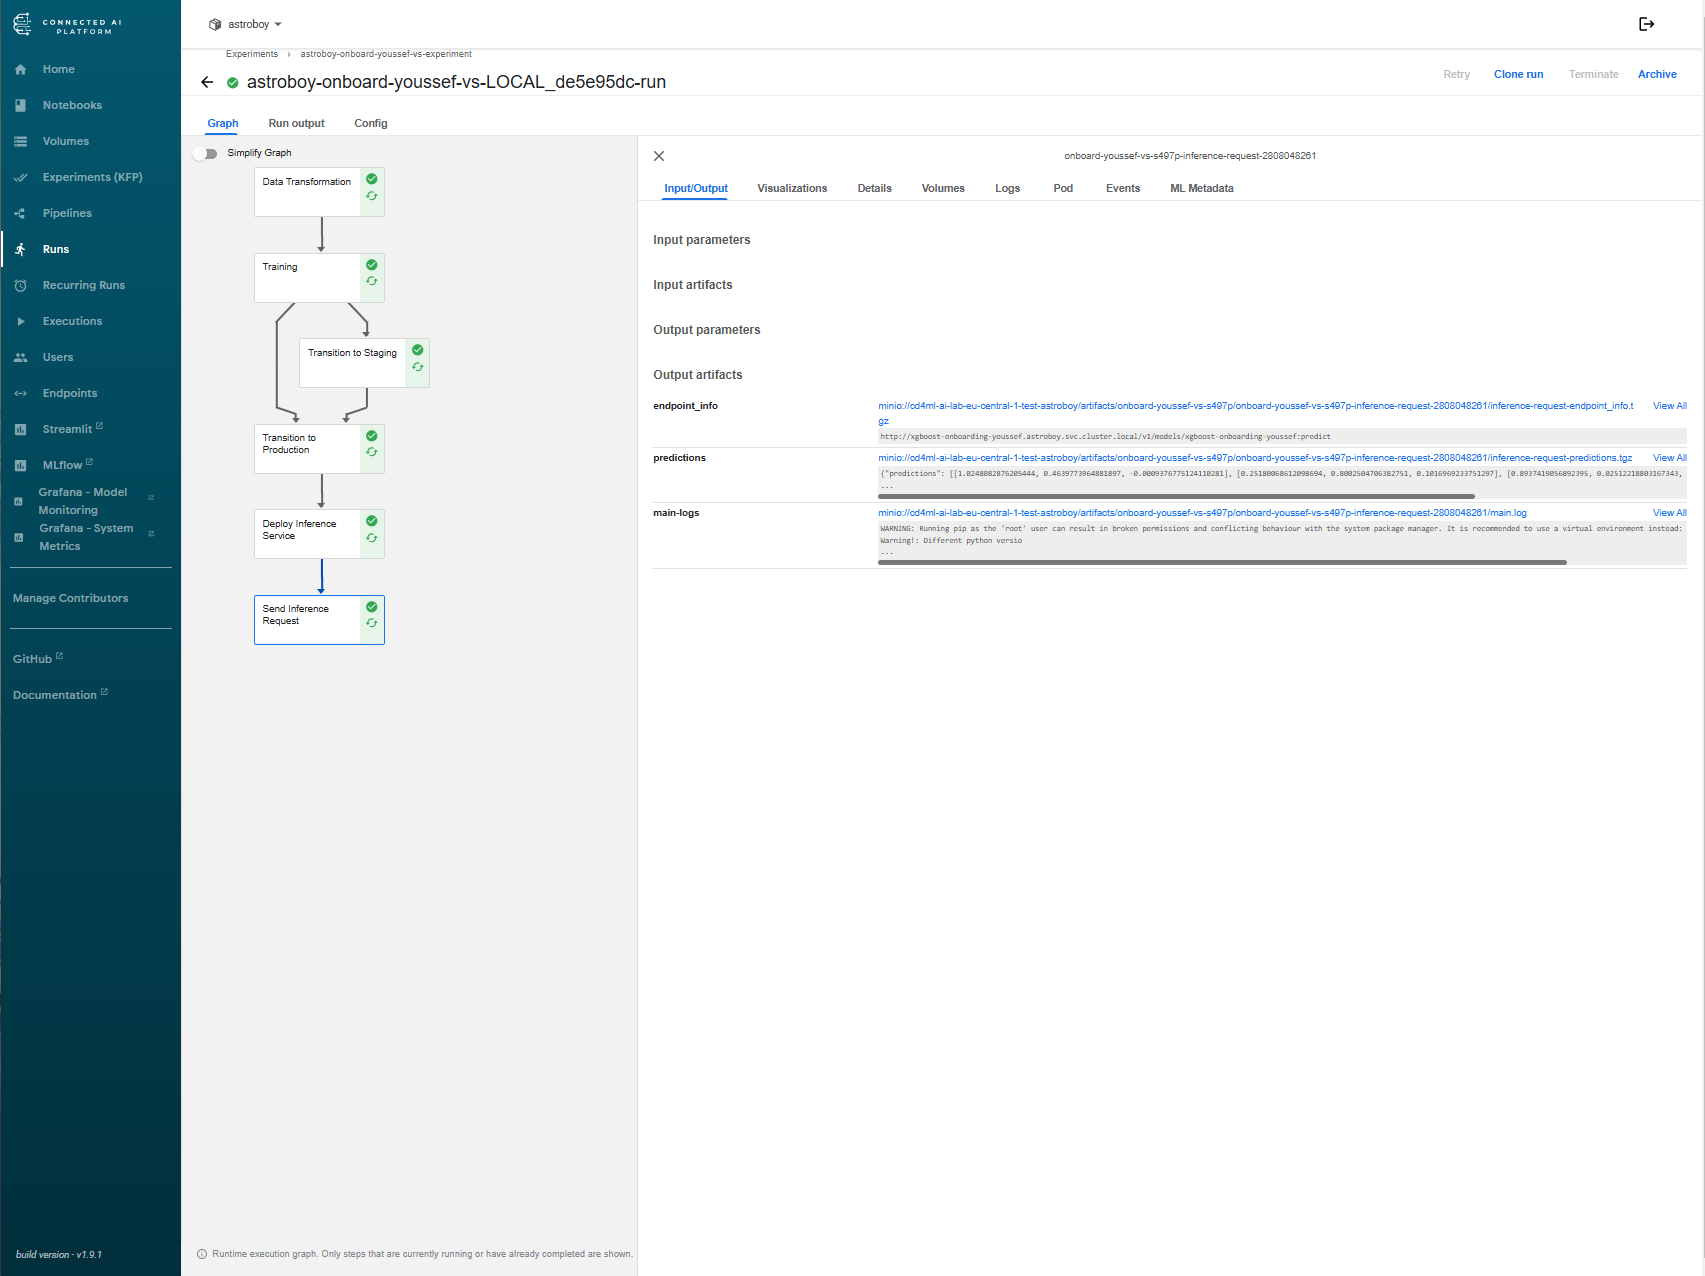
After running your pipeline, navigate to the pipeline execution view and locate the "Send Inference Request" step.
Step 2: Inspect the Results
Click on the "Send Inference Request" step to open the side panel containing detailed information about the execution.
The side panel will display:
- Endpoint Information: The URL where the request was sent
- Predictions: The model's output predictions for your test data
- Logs: Any logging information from the component execution
- Status: Whether the inference request succeeded or failed
Step 3: Verify the Output
Check that:
- The status code is 200 (successful)
- The predictions match the expected output format
- All input samples received predictions
- The values are within reasonable ranges for your use case
Pipeline Completion
Congratulations! You've successfully built a complete Kubeflow pipeline that:
✓ Prepares and processes your training data
✓ Trains your machine learning model
✓ Validates model performance
✓ Packages and deploys the model to a serving endpoint
✓ Tests the endpoint with sample data
✓ Captures and logs prediction results
Next Steps
Your pipeline is now ready to be customized for your specific use case. You can:
- Modify input data by updating
request.jsonwith your own test samples - Adjust parameters to optimize model training and serving
- Add additional steps for data validation, model evaluation, or post-processing
- Schedule automated runs to continuously train and deploy updated models
- Scale the pipeline to handle larger datasets and production workloads
Reference Code
If you encountered any issues during development, refer to the complete reference implementation at: https://bmw.ghe.com/AI-Lab/DemoOnboarding-AILab
Tip: Keep the pipeline logs accessible during development. They provide valuable debugging information and help you understand data flow through each component of your pipeline.