Triggering Pipeline Runs from Your Notebook
Introduction
Once your project is set up and ready, you can trigger pipeline runs directly from your Kubeflow Notebook or VS Code server environment. This guide walks you through configuring Daytona for cluster access, understanding the pipeline structure, and examining the key components that make up a complete machine learning pipeline. By the end of this section, you'll be able to execute your pipeline and monitor its progress.
Daytona Setup for Cluster Access
To trigger pipeline runs from your notebook, you need to configure Daytona, which provides authentication and access to the Kubeflow cluster.
Step 1: Clone the Daytona Repository
Start by cloning the Daytona development tools:
Clone Daytona dev-tools
git clone https://bmw.ghe.com/daytona/dev-tools
Step 2: Follow the Setup Instructions
Navigate to the cloned repository and follow the README instructions to complete the setup:
View typical setup steps
Follow the README file in the dev-tools repository. The setup typically includes adding Daytona initialization commands to your shell configuration file (.bashrc, .zshrc, etc.).
Step 3: Verify Daytona Installation
Confirm that Daytona is initializing correctly by testing it in your terminal:
Test Daytona installation
daytona --version
If Daytona is properly installed, this command will display the version information.
Step 4: Clone the Accounts Repository
In the same parent directory where you cloned Daytona, clone the accounts repository:
Clone Daytona accounts repository
git clone https://bmw.ghe.com/daytona/accounts
Step 5: Assume the Correct AWS Role
Authenticate with your cluster by assuming the correct AWS role. Run the following command, adjusting the region and role ID as needed for your specific cluster:
Assume AWS role and authenticate to ECR
daytona-use 493239015811 -r daytona/daytona-developer-caip && aws ecr get-login-password --region eu-central-1 | docker login --username AWS --password-stdin 493239015811.dkr.ecr.eu-central-1.amazonaws.com
Parameters to customize:
493239015811: Your AWS account ID (for AI Lab dev, use this value)-r daytona/daytona-developer-caip: Your role nameeu-central-1: Your AWS region
Replace these values with your cluster's specific configuration if different from the AI Lab defaults.
Optional: Local Device Setup
If you want to trigger pipeline runs from your local machine (rather than from the notebook), follow these additional steps.
Install the ORBIT-USE CLI
Install orbit-use CLI
Install the CLI using pipx (recommended):
pipx install orbit-use --pip-args="--extra-index-url https://packages.orbit.bmwgroup.net/artifactory/api/pypi/funmarkt-orbit-use/simple"
Or with pip:
pip3 install orbit-use --index-url https://packages.orbit.bmwgroup.net/artifactory/api/pypi/funmarkt-orbit-use/simple"
Generate AWS Credentials
Execute below command that authenticates you and configures your environment for CAIP access. The CLI sets up cloud CLI integration, so you can use tools like aws with the configured profile.
Details
orbit-use cloud <orbit-space> <dev|prod> <orbit-teamspace> --role caip-developer
For more details check here
Understanding the Pipeline Structure
The Pipeline Entry Point
The main file that controls how your pipeline runs is:
your_project_name/ml_pipeline/pipeline.py
A Kubeflow pipeline is composed of individual steps, where each step runs as a Python container that's converted to a Docker container at runtime. These pipeline components are typically organized in the components folder alongside pipeline.py and are imported into the main pipeline file.
Example Pipeline Definition
Here's a complete example pipeline you can use as a reference:
View example pipeline structure
from ml_pipeline.components.data_transformation import data_transformation
from ml_pipeline.components.model_evaluation import model_evaluation
from ml_pipeline.components.training import training


@pipeline(name=pipeline_title)
def ml_pipeline():
    data_transformation_step = data_transformation(
        data_s3_path=f"s3://{account.data_bucket_name}/abalone.csv",
        output_s3_key=run_id_path,
    )
    data_transformation_step.set_display_name("Data Transformation")
    set_max_cache_staleness(data_transformation_step)

    training_step = training(
        data_s3_path=data_transformation_step.outputs["train_data_s3_path"],
        output_s3_key=run_id_path,
    )
    training_step.set_display_name("Training")
    set_max_cache_staleness(training_step)

    model_evaluation_step = model_evaluation(
        data_s3_path=data_transformation_step.outputs["test_data_s3_path"],
        model_s3_path=training_step.output,
    )
    model_evaluation_step.set_display_name("Model Evaluation")
    set_max_cache_staleness(model_evaluation_step)
This pipeline defines three steps that execute in a specific order, with data flowing from one step to the next.
Defining Execution Order with Dependencies
By default, pipeline steps execute in the order you define them. However, when you have complex dependencies where a step depends on multiple previous steps, you can explicitly specify this using the .after() function.
Example: Multiple Dependencies
Define multiple step dependencies
If you have a step that should run only after multiple other steps complete, you can chain .after() calls:
production_transition_step.after(staging_transition_step)
production_transition_step.after(testing_and_evaluation_step)
In this example, production_transition_step will only execute after both staging_transition_step and testing_and_evaluation_step have completed successfully.
Pipeline Components in Detail
Your example pipeline consists of three main components. Let's examine each one in detail.
Component 1: Data Transformation
The data transformation component loads raw data, applies preprocessing transformations, and splits the data into training and test sets.
What This Component Does
- Loads raw data from S3
- Applies feature scaling and encoding transformations
- Splits data into training and test sets
- Uploads transformed data back to S3
- Returns paths to both datasets for downstream steps
Data Transformation Code
View data_transformation.py
import logging
from collections import namedtuple
from typing import NamedTuple

from boto3 import resource
from caip_sdk.cli.app import caip
from cloudpathlib import S3Path
from kfp.components import func_to_container_op
from pandas import DataFrame, read_csv
from sklearn.compose import ColumnTransformer
from sklearn.impute import SimpleImputer
from sklearn.model_selection import train_test_split
from sklearn.pipeline import Pipeline
from sklearn.preprocessing import OneHotEncoder, StandardScaler

from ml_pipeline.components.utils import pipeline_logging_config

logging.basicConfig(level=caip.extra_config["log_level"])


def write_data_frame_to_s3(data: DataFrame, s3_path: str) -> str:
    s3, s3_path = resource("s3"), S3Path(s3_path)

    data_csv = data.to_csv(None, index=False).encode("utf-8")
    s3.Object(s3_path.bucket, s3_path.key).put(Body=data_csv)

    return str(s3_path)


def transform_cols(
    data: DataFrame, numeric_cols: list, categorical_cols: list
) -> DataFrame:
    numeric_transforms = Pipeline(
        [
            ("impute_median", SimpleImputer(strategy="median")),
            ("scale", StandardScaler()),
        ]
    )
    categorical_transforms = Pipeline(
        [
            ("impute_const", SimpleImputer(strategy="constant", fill_value="missing")),
            ("one_hot", OneHotEncoder(handle_unknown="ignore", sparse_output=False)),
        ]
    )
    transformer = ColumnTransformer(
        [
            ("numeric", numeric_transforms, numeric_cols),
            ("categorical", categorical_transforms, categorical_cols),
        ],
        verbose_feature_names_out=False,
    )

    return transformer.set_output(transform="pandas").fit_transform(data)


@pipeline_logging_config
def transform_data(data_s3_path: str, output_s3_key: str) -> NamedTuple(
    "outputs",
    [("train_data_s3_path", str), ("test_data_s3_path", str)],  # noqa: F821
):
    logging.info("Applying transformations to raw data")
    s3, data_s3_path = resource("s3"), S3Path(data_s3_path)

    raw_data = s3.Object(data_s3_path.bucket, data_s3_path.key).get()["Body"]
    raw_data_df = read_csv(raw_data)
    data_df = transform_cols(
        raw_data_df,
        numeric_cols=[
            "length",
            "diameter",
            "height",
            "whole_weight",
            "shucked_weight",
            "viscera_weight",
            "shell_weight",
        ],
        categorical_cols=["sex"],
    )

    logging.info("Writing the transformed train and test data to S3")
    train_df, test_df = train_test_split(data_df)
    train_data_s3_path, test_data_s3_path = (
        write_data_frame_to_s3(train_df, f"{output_s3_key}/train.csv"),
        write_data_frame_to_s3(test_df, f"{output_s3_key}/test.csv"),
    )
    outputs = namedtuple("outputs", ["train_data_s3_path", "test_data_s3_path"])

    return outputs(train_data_s3_path, test_data_s3_path)


data_transformation = func_to_container_op(
    func=transform_data,
    use_code_pickling=True,
    modules_to_capture=[
        "ml_pipeline.components.data_transformation",
        "ml_pipeline.components.utils",
    ],
    base_image=caip.cd4ml_config.get_python_base_image(),
    packages_to_install=[
        "boto3",
        "cloudpathlib",
        "cloudpickle",
        "fsspec",
        "pandas",
        "scikit-learn",
        "s3fs",
        "xgboost",
    ],
)
Component 2: Training
The training component loads the transformed training data and trains an XGBoost regression model, tracking training metrics in the process.
What This Component Does
- Loads transformed training data from S3
- Trains an XGBoost regression model
- Records training time as a performance metric
- Saves the trained model to S3
- Returns the S3 path to the trained model for use in evaluation
Training Code
View training.py
import logging
from datetime import datetime
from json import dump
from tempfile import NamedTemporaryFile

from boto3 import resource
from caip_sdk.cli.app import caip
from cloudpathlib import S3Path
from kfp.components import OutputPath, func_to_container_op
from pandas import DataFrame, read_csv
from xgboost import XGBRegressor

from ml_pipeline.components.utils import features_target_split, pipeline_logging_config

logging.basicConfig(level=caip.extra_config["log_level"])


def fit_xgboost(data: DataFrame) -> XGBRegressor:
    xgb = XGBRegressor()

    x, y = features_target_split(data)
    xgb.fit(x, y, verbose=False)

    return xgb


def write_model_to_s3(model_object, s3_prefix: str):
    s3, s3_path = resource("s3"), S3Path(s3_prefix) / "model.bst"
    with NamedTemporaryFile() as tmp:
        model_object.save_model(tmp.name)
        s3.Bucket(s3_path.bucket).upload_file(tmp.name, s3_path.key)

    return str(s3_path)


@pipeline_logging_config
def train(
    data_s3_path: str,
    output_s3_key: str,
    mlpipeline_metrics_path: OutputPath("Metrics"),
) -> str:
    logging.info("Fitting a model")
    s3, data_s3_path = resource("s3"), S3Path(data_s3_path)

    data = s3.Object(data_s3_path.bucket, data_s3_path.key).get()["Body"]
    data_df = read_csv(data)
    start_training_timestamp = datetime.now()
    fitted = fit_xgboost(data_df)
    total_training_time = (datetime.now() - start_training_timestamp).total_seconds()

    metrics_scalar = {
        "metrics": [
            {
                "name": "TrainingTime",
                "numberValue": total_training_time,
                "format": "RAW",
            }
        ]
    }
    with open(mlpipeline_metrics_path, "w") as f:
        dump(metrics_scalar, f)

    logging.info("Storing the model in S3")
    model_s3_path = write_model_to_s3(fitted, output_s3_key)

    return model_s3_path


training = func_to_container_op(
    func=train,
    use_code_pickling=True,
    modules_to_capture=[
        "ml_pipeline.components.training",
        "ml_pipeline.components.utils",
    ],
    base_image=caip.cd4ml_config.get_python_base_image(),
    packages_to_install=[
        "boto3",
        "cloudpathlib",
        "cloudpickle",
        "fsspec",
        "pandas",
        "s3fs",
        "scikit-learn",
        "xgboost",
        "kfp==1.8.22",
    ],
)
Component 3: Model Evaluation
The model evaluation component loads the trained model and test data, generates predictions, and calculates performance metrics.
What This Component Does
- Loads the trained model from S3
- Loads the transformed test data from S3
- Generates predictions on test data
- Calculates evaluation metrics (Mean Squared Error)
- Returns formatted results for visualization in the Kubeflow UI
Model Evaluation Code
View model_evaluation.py
import logging
from json import dump
from tempfile import NamedTemporaryFile
from typing import NamedTuple

from boto3 import resource
from caip_sdk.cli.app import caip
from cloudpathlib import S3Path
from kfp.components import OutputPath, func_to_container_op
from pandas import DataFrame, read_csv
from sklearn.metrics import mean_squared_error
from xgboost import XGBRegressor

from ml_pipeline.components.utils import (
    features_target_split,
    format_as_kubeflow_table,
    pipeline_logging_config,
)

logging.basicConfig(level=caip.extra_config["log_level"])


def load_xgboost_regressor_from_s3(model_s3_path: str):
    s3, model_s3_path = resource("s3"), S3Path(model_s3_path)
    with NamedTemporaryFile() as tmp:
        s3.Bucket(model_s3_path.bucket).download_file(model_s3_path.key, tmp.name)
        model = XGBRegressor()
        model.load_model(tmp.name)

    return model


def calculate_mse(data: DataFrame, model):
    x, y = features_target_split(data)

    return mean_squared_error(y, model.predict(x))


@pipeline_logging_config
def evaluate_model(
    data_s3_path: str,
    model_s3_path: str,
    mlpipeline_metrics_path: OutputPath("Metrics"),
) -> NamedTuple("outputs", [("mlpipeline_ui_metadata", "UI_metadata")]):  # noqa: F821
    logging.info("Loading the model")
    model = load_xgboost_regressor_from_s3(model_s3_path)

    logging.info("Calculating MSE on the test data")
    s3, data_s3_path = resource("s3"), S3Path(data_s3_path)

    data = s3.Object(data_s3_path.bucket, data_s3_path.key).get()["Body"]
    data_df = read_csv(data)
    mse = calculate_mse(data_df, model)

    metrics_scalar = {"metrics": [{"name": "MSE", "numberValue": mse, "format": "RAW"}]}
    with open(mlpipeline_metrics_path, "w") as f:
        dump(metrics_scalar, f)

    return format_as_kubeflow_table(DataFrame([{"MSE": mse}]))


model_evaluation = func_to_container_op(
    func=evaluate_model,
    use_code_pickling=True,
    modules_to_capture=[
        "ml_pipeline.components.model_evaluation",
        "ml_pipeline.components.utils",
    ],
    base_image=caip.cd4ml_config.get_python_base_image(),
    packages_to_install=[
        "boto3",
        "cloudpathlib",
        "cloudpickle",
        "fsspec",
        "pandas",
        "scikit-learn",
        "s3fs",
        "xgboost",
        "kfp==1.8.22",
    ],
)
How Data Flows Through the Pipeline
Now that you understand each component, here's how they work together:
- Data Transformation: Raw data is loaded from S3, transformed, and split into training and test sets
- Training: The training data is used to train the XGBoost model, which is saved to S3
- Model Evaluation: The test data and trained model are used to generate predictions and calculate performance metrics
Each step depends on the outputs of previous steps, creating a cohesive workflow from raw data to model evaluation. This structure ensures reproducibility and allows you to track the complete machine learning process in Kubeflow.
Important Configuration Before Running Your Pipeline
Introduction
Before you trigger your first pipeline run, there are several critical configuration steps you must complete. This guide walks you through updating logging levels across your components, configuring the data source paths, initializing your Git repository, and triggering your pipeline using the CAIP SDK. These steps ensure your pipeline runs smoothly and logs are generated at the appropriate level for debugging and monitoring.
Pre-Pipeline Configuration Steps
Overview
There are three main configuration tasks to complete before running your pipeline:
- Set logging levels in all components
- Configure the data source path in your pipeline
- Initialize a Git repository in your project
These steps can be done manually now, and you can configure them permanently through the CAIP SDK configuration later.
Step 1: Configure Logging Levels
Finding All Logging Configuration Instances
Your pipeline components use a logging configuration that references the CAIP extra config. You need to replace these with explicit logging levels for immediate functionality.
Open the Project Search
Use your IDE's search functionality to find all occurrences:
Using VS Code to find logging configurations
Press Ctrl + Shift + F (or Cmd + Shift + F on macOS) to open the global search panel. This searches across all files in your project.
Search for the Logging Configuration
Search term to find logging instances
Search for:
logging.basicConfig(level=caip.extra_config["log_level"])
This will find all components that use the CAIP config-based logging level.
Replace with Explicit Logging Level
Replace logging configuration across all components
Replace all instances of:
logging.basicConfig(level=caip.extra_config["log_level"])
With:
logging.basicConfig(level=logging.INFO)
This sets all components to log at the INFO level, which provides useful information without excessive verbosity.
Why This Change
By using explicit logging levels now, your components will generate logs immediately. Later, you can configure these permanently through the CAIP SDK's config.yaml file by following the CAIP SDK documentation.
Step 2: Configure the Data Source Path
Understanding the Configuration
Your pipeline's pipeline.py file currently references data paths through the CAIP extra config. You need to replace this with an explicit data path to run the pipeline immediately.
Locate the Configuration in pipeline.py
Open your pipeline.py file and find the ml_pipeline() function definition.
Original Configuration
View original data source configuration
def ml_pipeline(filename: str = "abalone.csv"):
    logging.info("Generating Kubeflow Pipeline")

    data_transformation_step = data_transformation(
        data_s3_path=caip.extra_config["cdh_abalone_bucket"] + f"/{filename}",
        output_s3_key=run_id_path,
    )
This references caip.extra_config["cdh_abalone_bucket"], which needs to be replaced with an explicit S3 path.
Updated Configuration
Replace with explicit S3 path
Replace the data source line with:
def ml_pipeline(filename: str = "abalone.csv"):
    logging.info("Generating Kubeflow Pipeline")

    data_transformation_step = data_transformation(
        data_s3_path=f"s3://cdh-dto-abalone-sem-nkbl/{filename}",
        output_s3_key=run_id_path,
    )
This explicit S3 path points to the Abalone dataset bucket that your pipeline will use for training.
Configuring Permanently Through CAIP SDK
Once your pipeline runs successfully, you can configure these values permanently in your config/config.yaml file. Refer to the CAIP SDK documentation for instructions on setting up the extra config properly.
Step 3: Initialize Your Git Repository
Why Git Initialization is Required
The CAIP SDK searches for a local Git repository to manage your pipeline code. You must initialize Git in your project directory before running the pipeline.
Initialize Git
Initialize a new Git repository
In your project root directory, run:
git init
This creates a .git directory that tracks your project's version history.
Verify Git Initialization
Confirm Git is initialized
Check that Git has been initialized by running:
git status
If successful, you'll see output indicating your Git repository status and any untracked files.
Understanding Pipeline Runs
What is a Pipeline Run?
A pipeline run represents a specific execution of your pipeline at a particular point in time. Each run must have a unique name and must be associated with a Kubeflow experiment. This allows you to track and compare different executions of the same pipeline with different parameters or data.
Types of Runs
Single Run: A one-time execution of your pipeline for testing or validation purposes.
Recurring Run: A pipeline that executes automatically on a scheduled basis, such as daily model retraining or weekly batch processing.
Triggering Runs with the CAIP SDK
Understanding CAIP SDK
The CAIP SDK (Connected AI Platform SDK) provides command-line tools to manage and execute your Kubeflow pipelines. It simplifies pipeline management by providing convenient commands for common tasks.
Prerequisites
Ensure you have:
- CAIP SDK installed and configured
- Cluster access configured through Daytona (as described in the previous section)
- Your pipeline properly set up with logging and data source configurations
For more information, visit: https://bmw.ghe.com/connected-ai/caip-sdk
Triggering a Single Pipeline Run
Execute the Command
To trigger a single execution of your pipeline, use the CAIP SDK command:
Trigger a single pipeline run
caip run-pipeline
This command executes your pipeline.py once and submits it to your Kubeflow cluster.
What Happens Next
After executing the command:
- CAIP SDK packages your pipeline code
- Creates Docker containers for each component
- Submits the pipeline to your Kubeflow cluster
- Returns a link to monitor your pipeline execution
- Each step in your pipeline executes in the defined order
Scheduling Recurring Runs
Creating a Recurring Run
To automatically execute your pipeline on a schedule, use the recurring run command with a cron expression:
Create a recurring pipeline run
caip create_recurring_run --cron_expression <your_cron_expression>
Replace <your_cron_expression> with a valid cron expression defining when the pipeline should run.
Cron Expression Examples
Common cron expression patterns
0 0 * * *- Runs daily at midnight0 9 * * 1- Runs every Monday at 9:00 AM0 */6 * * *- Runs every 6 hours0 0 1 * *- Runs on the first day of every month30 2 * * 0-4- Runs weekdays at 2:30 AM
For more cron expression details, consult crontab.guru.
CAIP SDK Command Reference
Accessing Complete Documentation
For a comprehensive list of all available CAIP SDK commands and their options, visit:
CAIP SDK command reference
https://bmw.ghe.com/connected-ai/caip-sdk/blob/main/caip_sdk/cli/app.py
This file contains all available commands, their parameters, and usage examples.
Monitoring and Running Kubeflow Pipelines
Viewing Pipeline Execution
After triggering a run, a terminal link will appear that directs you to your pipeline execution:
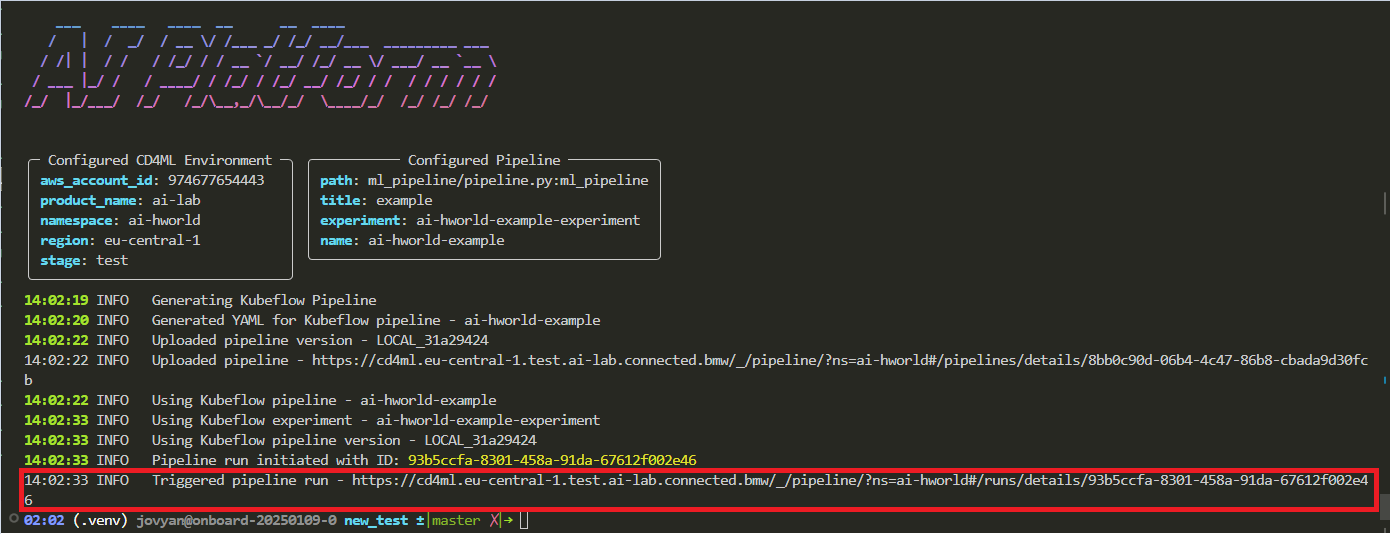
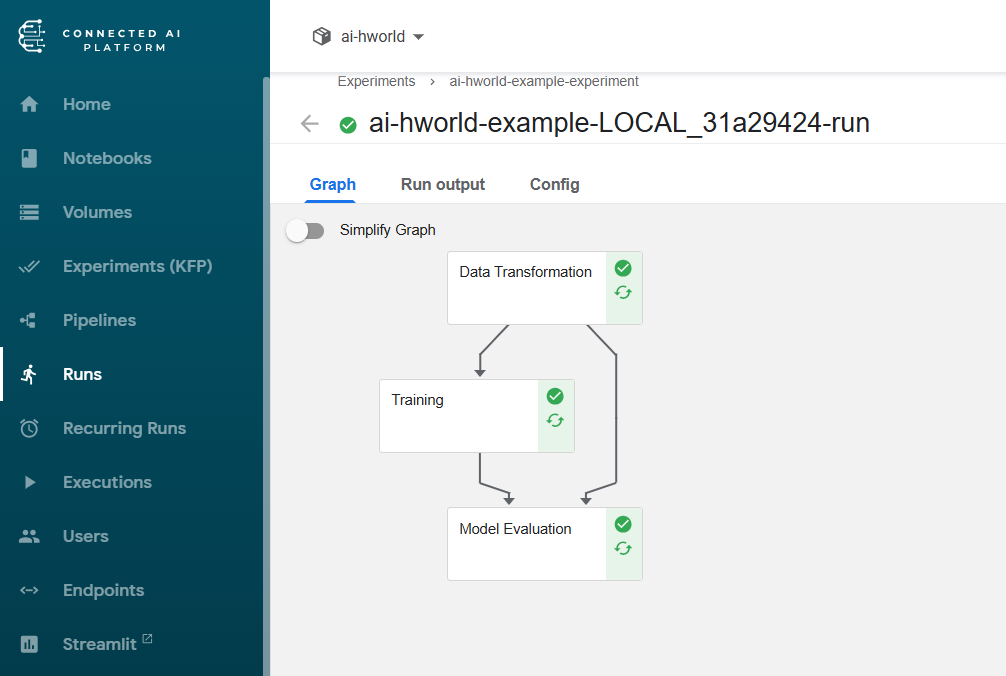
Click this link to view your pipeline in the Kubeflow UI and monitor its progress.
Inspecting Container Logs
To debug or monitor specific pipeline steps:
- Click on any container step in the pipeline visualization
- Navigate to the Logs tab in the opened panel
- Review the execution logs and output from that step
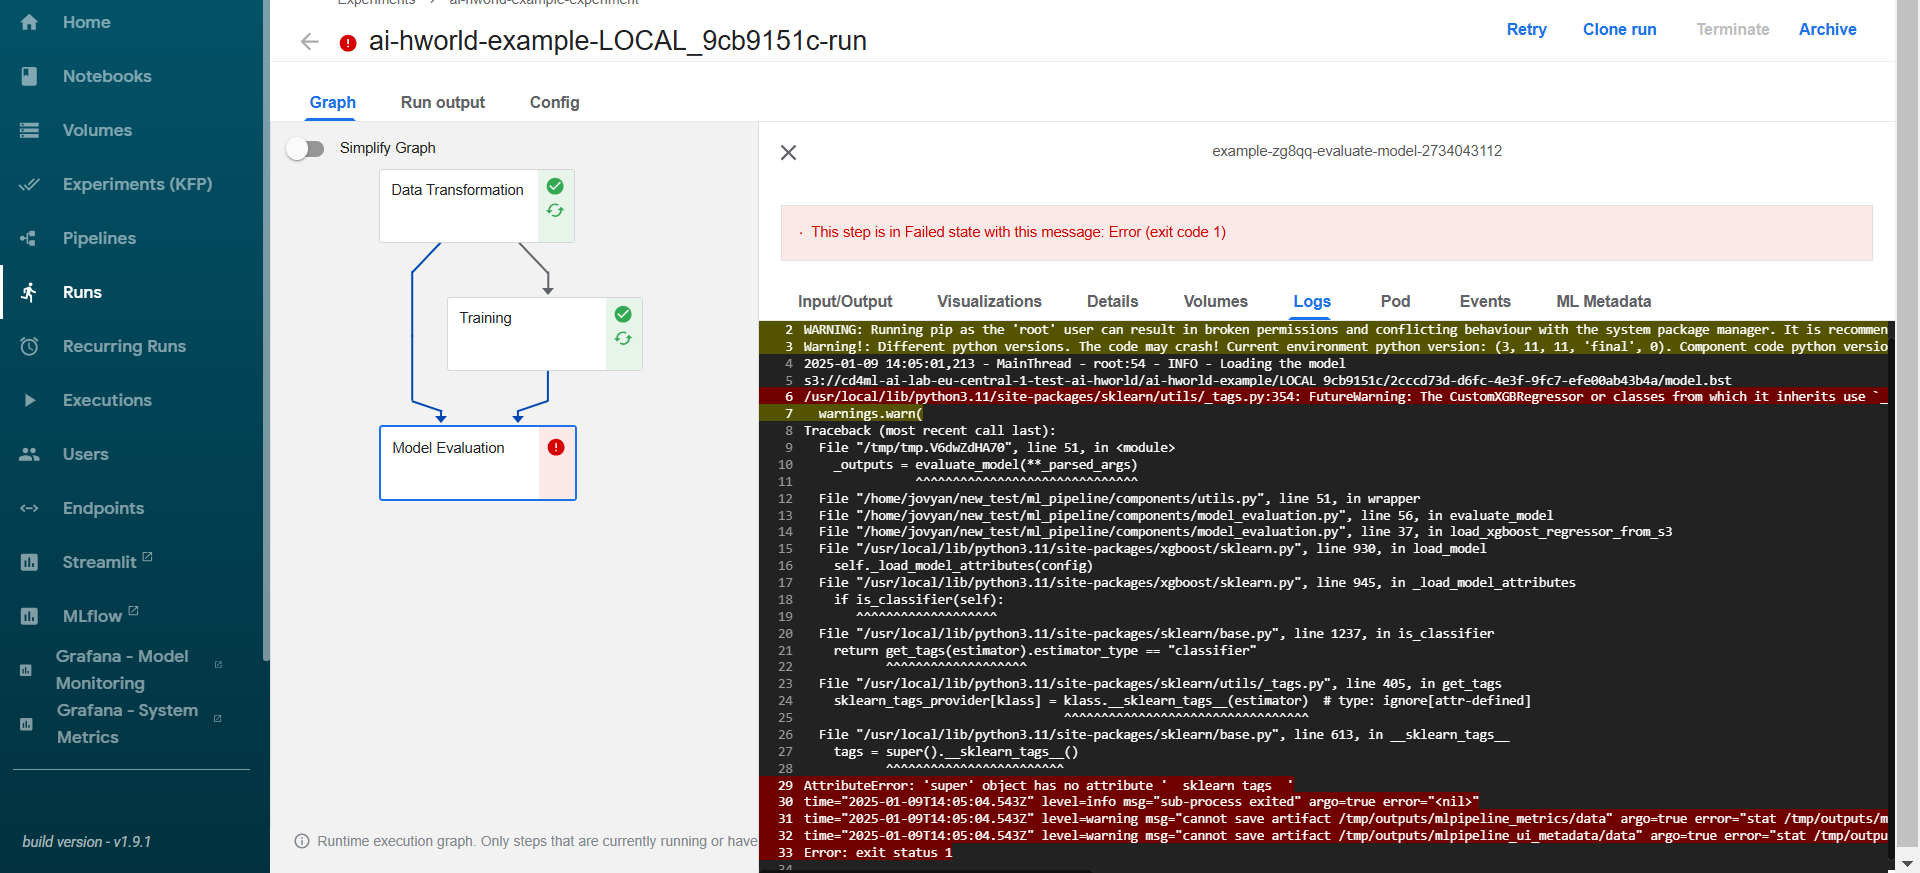
Troubleshooting: SKLearn Tag Error
Fix XGBoost version compatibility errors
If you encounter an SKLearn or XGBoost version-related error, you need to specify XGBoost version 1.6 in your component files:
Update the following files:
training.pymodel_evaluation.pydata_transformation.py(if applicable)
Add to package dependencies:
xgboost==1.6
Running Pipelines from the Kubeflow UI
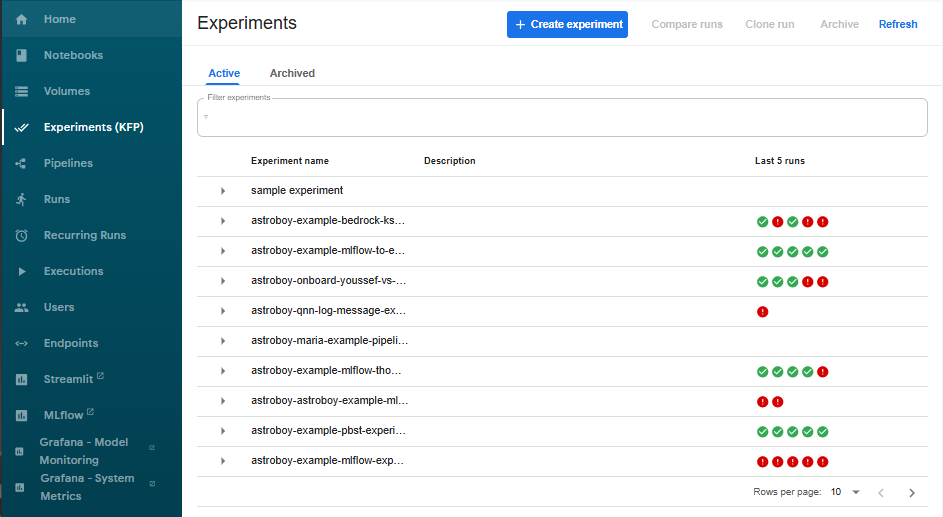
Step 1: Create an Experiment
Before running a pipeline from the UI, set up an experiment to organize your runs.
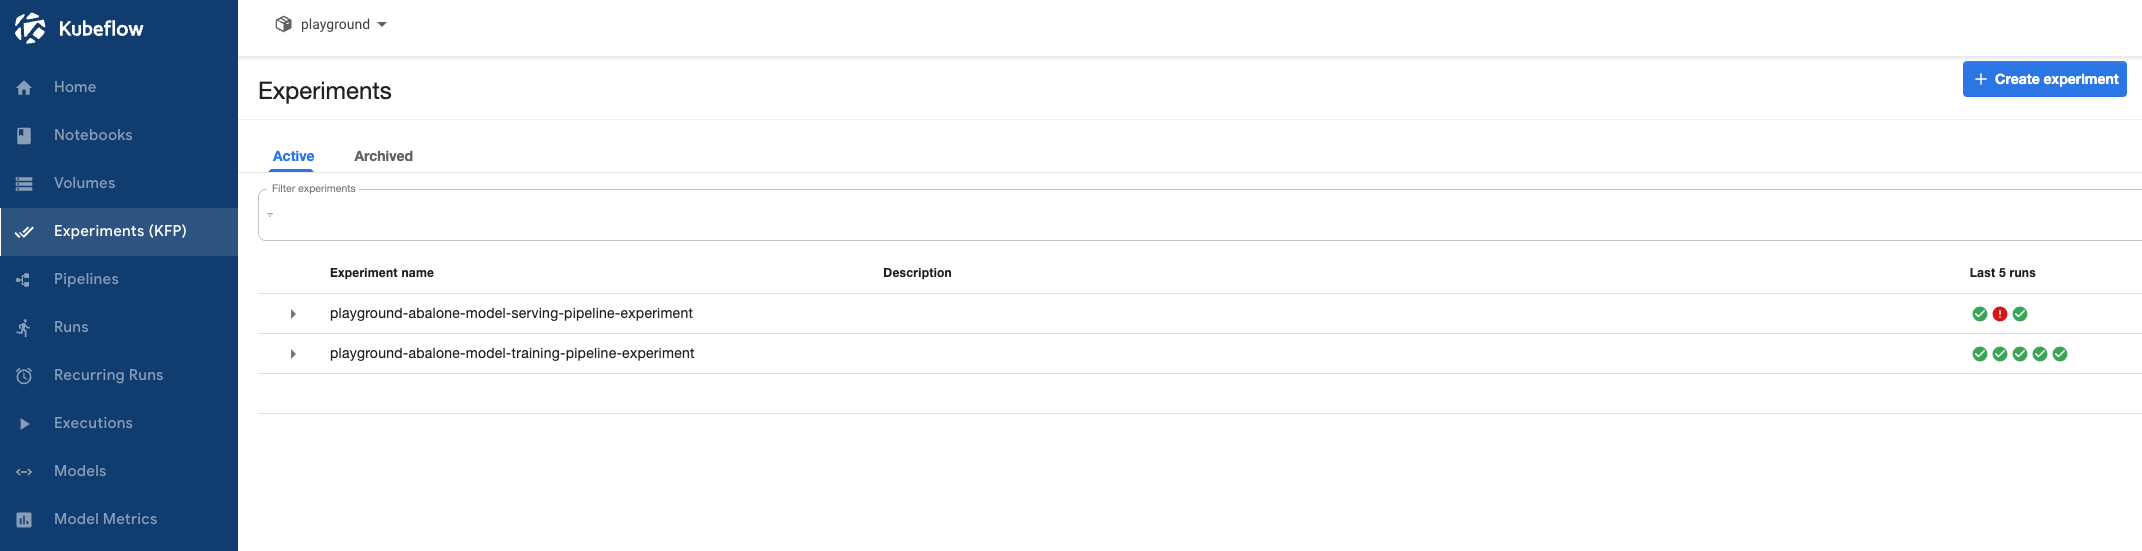
- Navigate to the Experiments KFP tab in the Kubeflow UI
- Click the Create Experiment button
- Enter your desired experiment name
- Click Create
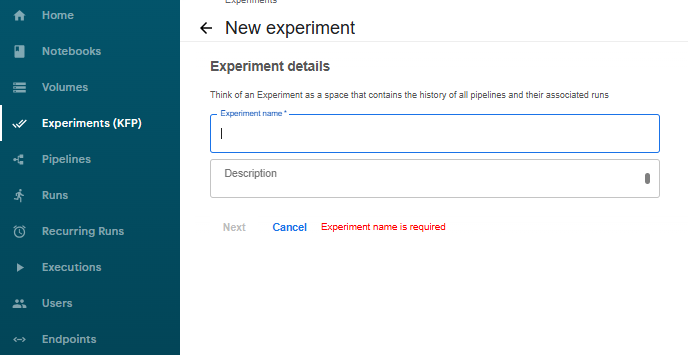
Step 2: Create a New Run
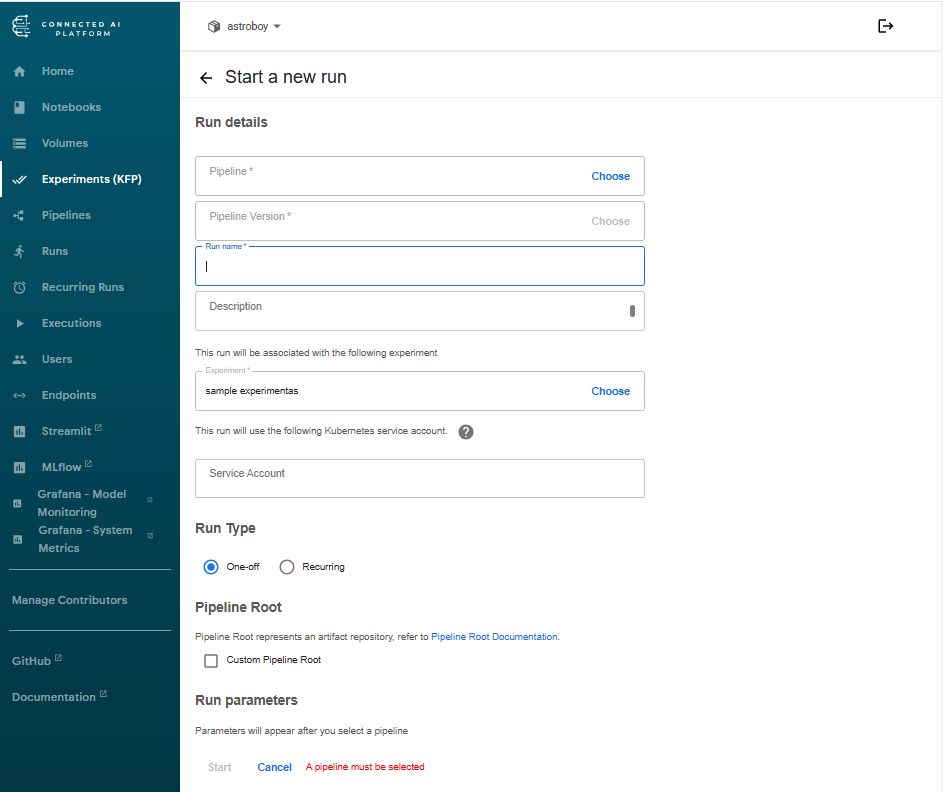
After creating your experiment, you'll be redirected to a form to create your first run.
Step 3: Configure Your Run
- Select the pipeline you want to execute
- Choose the specific pipeline version
- Enter a unique name for this run
- Click Create
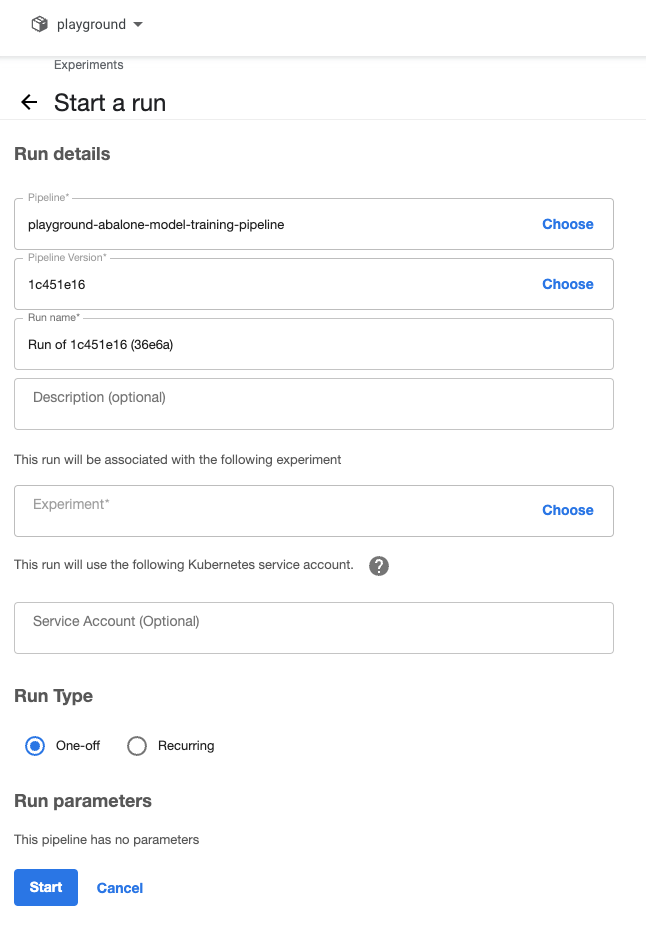
Step 4: Choose Run Type
Kubeflow offers two run types:
Single Run: Executes your pipeline once. Use for testing, one-time training, or manual execution.
Recurring Run: Executes periodically based on a schedule. Use for daily retraining, batch processing, or continuous workflows.
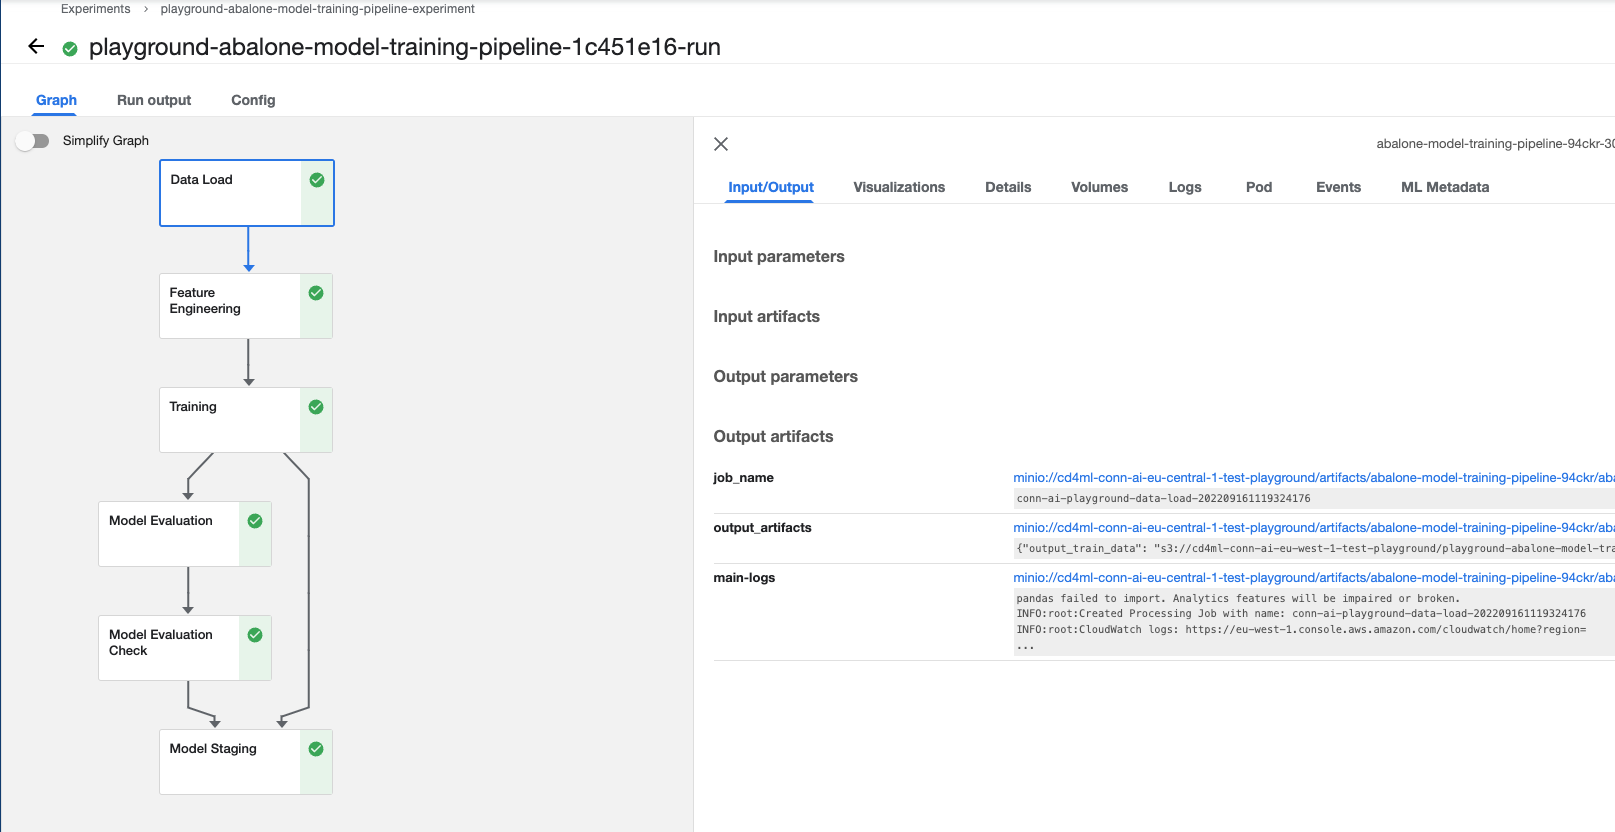
Monitoring Run Execution
Once you start a run, pipeline steps execute in the defined order. To view your pipeline:
- Navigate to the Runs tab at your CD4ML portal
- Find your run in the list
- Click on it to view detailed execution information
Understanding Kubeflow Experiments
Experiments provide a powerful way to organize and compare multiple pipeline runs:
- Compare results across different pipeline configurations
- Track performance changes over time
- Organize runs by project, iteration, or objective
- Analyze how parameter changes affect outcomes
Running Pipelines via CI/CD
Automate pipeline execution by triggering runs whenever you push code to your repository.
Prerequisites: Enable GitHub Actions
Set up CI Trust permissions
To trigger pipeline runs automatically on code commits, acquire permissions for GitHub Actions on your repository from the CI Trust system.
Follow the setup guide: CI-Trust & Spaceship Runners
By default, the pipeline configuration includes a GitHub Action that automatically triggers a run when code is pushed.
Step 1: Initialize Your Local Repository
Git initialization command
git init
Step 2: Commit Your Changes
Stage and commit code
git add .
git commit -m "your commit message"
Step 3: Create and Link a Remote Repository
Before pushing, create a remote repository following GitHub's guide and link it to your local repository.
Step 4: Push to Trigger the Pipeline
Push your code to trigger the pipeline
git push
Step 5: Monitor the CI/CD Execution
- Check the Actions tab in your GitHub repository to view the running workflow
- Wait for the GitHub Action to complete
- Navigate to the Runs tab at your CD4ML portal
- Locate your newly triggered pipeline run
Your pipeline now automatically executes whenever you push changes to your repository, enabling continuous integration and deployment.