Kubeflow Pipelines
Overview
Kubeflow Pipelines provide powerful orchestration capabilities for machine learning workflows on the Connected AI Platform. The Kubeflow UI offers three main areas for managing your ML workflows: Runs, Experiments, and Pipelines. Understanding these components and their relationships is essential for effective pipeline management and experiment tracking.
In the previous section we described how to get started with your project and demonstrated how easy it is to create a new project by using the CD4ML template. We did not go into detail about the structure of the project, different modules and pipelines, why are they structured that way and etc. This chapter aims to clarifying that and we will give more context by covering:
What are Kubeflow pipelines?
Earlier we described the concept of CD4ML and what is the Connected AI Platform approach to achieve it. We also mentioned that Kubeflow is the main tool to orchestrate many processes, one of which is a pipeline. On a high level Kubeflow pipelines are an orchestrator of machine learning workflows that are portable and reusable. In practice, that means defining multiple steps to perform tasks such as data integration process (extract, transform and load - ETL); model training and evaluation; model deployment and monitoring; conducting experiments and reproducing them; and etc.
Kubeflow Components
A pipeline consist of custom defined steps. Depending on what your need is, it can perform all the mentioned tasks or can do each in isolation. Each step in the Kubeflow pipeline can also be an encapsulated Docker container with it's own Docker image, and it is refferent to as a "pipeline component" or shortly as "kfp component". In most cases all you need is a "lightway Python component" that does some simple operations, but you can also build much more complex operations.
To build a pipeline, you simply chain different steps or components together. You can write your own custom methods for these steps, or package them into reusable YAML files to share across multiple pipelines. Using this same modular approach, the CAIP SDK provides pre-built components for common tasks like AWS Glue, EMR jobs, and run metrics. More details which you can find in the CAIP Kubeflow Components Section
Kubeflow UI
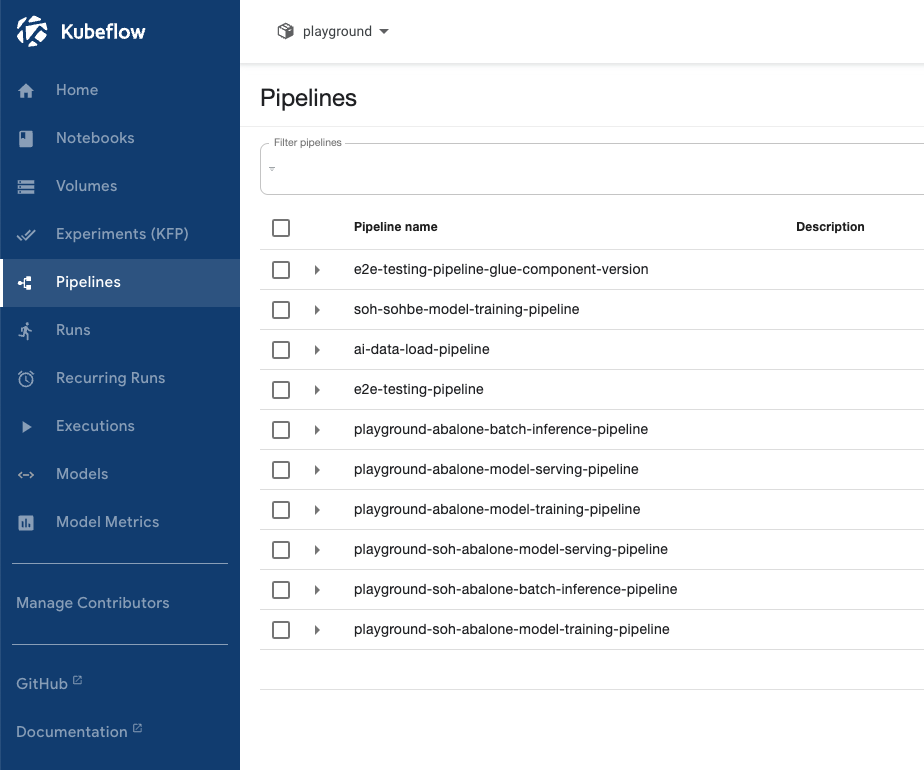
A visualisation of pipelines can be accessed from the Kubeflow UI:
When clicking on a pipeline definition, more details and the individual steps that compose a pipeline can be seen:
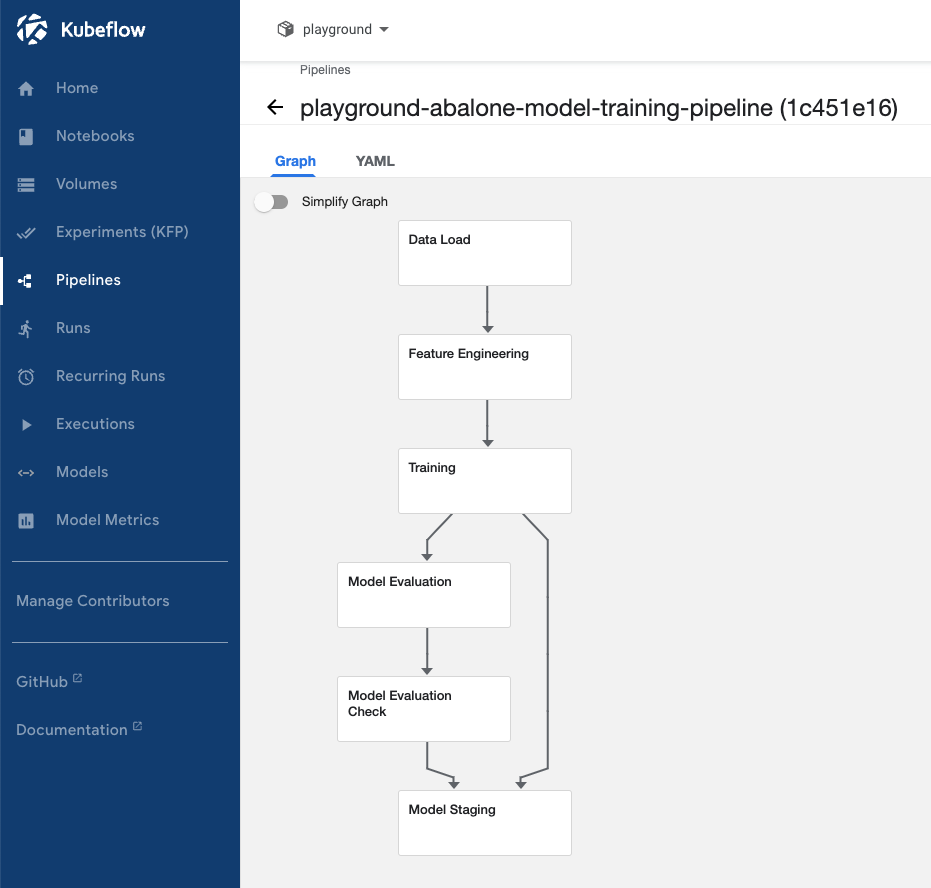
This example pipeline consists of six different steps: Data Load, Feature Engineering, Training, Model Evaluation, Model Evaluation Check and Model Staging. The arrows between steps symbolise a dependency and the execution order. It is also possible to create a dependency on multiple steps.
The logic of each of those steps is defined in python code and stored in a Github repository. We have created many examples of how these pipelines could be created to solve different problems. The conn-ai-demo / cd4ml-pipelines demonstrates by example how to do "batch inference", "live serving", "Sagemaker usage", "processing data with Glue" and much more.
Pipeline runs and recurring runs
A pipeline run refers to a specific version of a pipeline execution and needs to have a unique name. In addition a run needs to be associated with a Kubeflow experiment.
A Kubeflow pipeline can be "run" by pressing on the "Create run" button on the top right of a pipeline definition. Click here for further information.
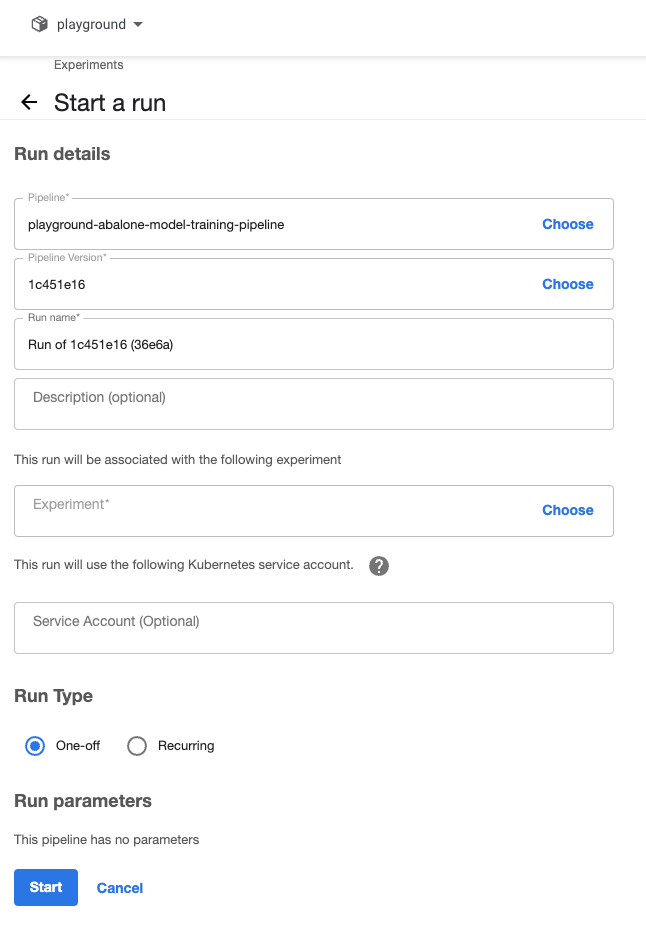
Runs are separated in two different types:
- single run - a single pipeline execution
- recurring runs - pipeline run that can be executed periodically based on the configuration

After starting a run, the steps in a pipeline are triggered and executed based on the defined order. Each step will produce logs and other output artefacts, which can be accessed from the Kubeflow UI by selecting a specific executed step:
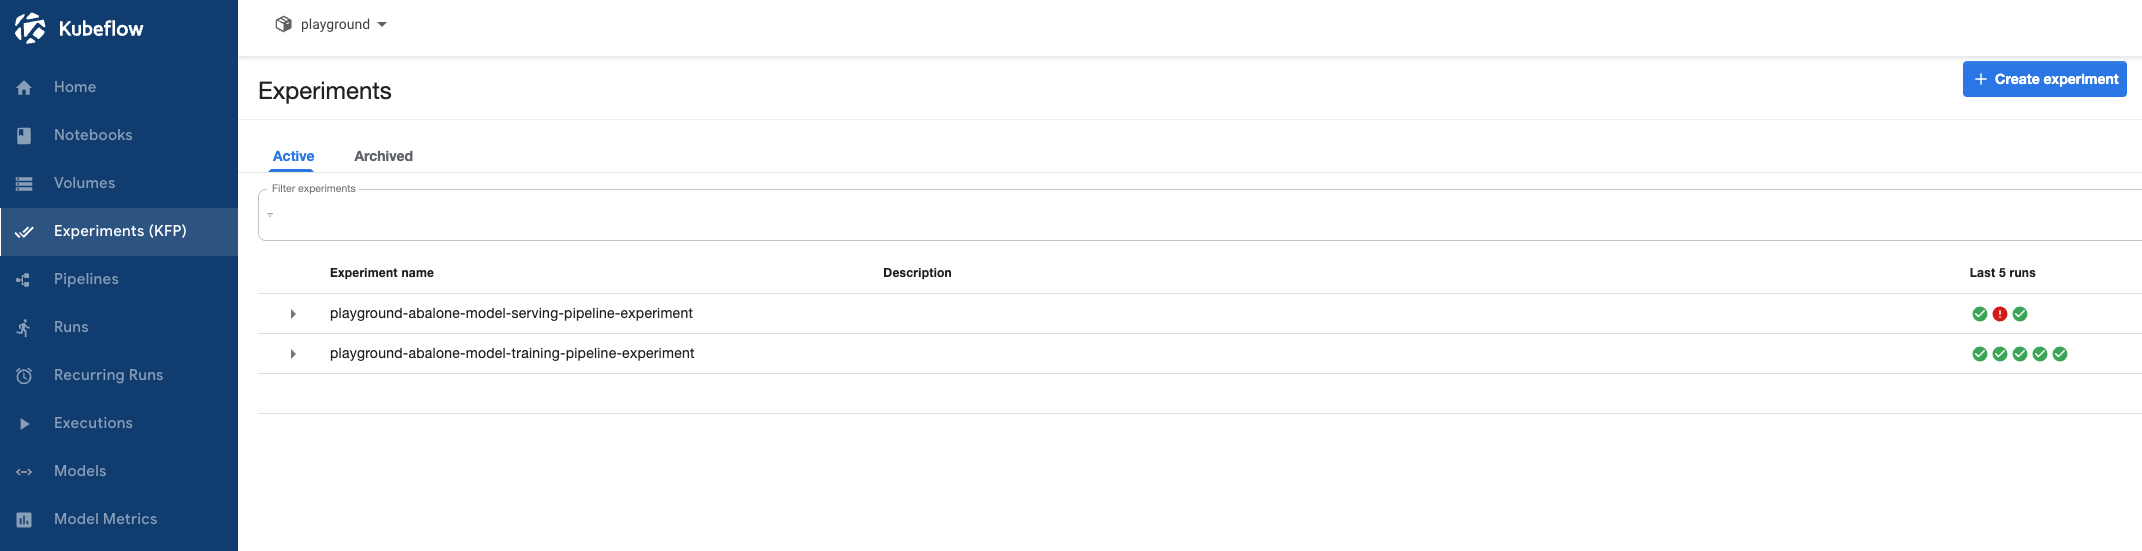
Kubeflow experiments
Experiments allow logical grouping of runs and are a powerful way to compare the results of different runs of the same pipeline.
Building your own Kubeflow pipeline components
As mentioned earlier, in most cases you don't need to build your own compontent, but you can do it. The Connected AI Platform has build some custom common components that you can use to "montior data quality", "evaluate classification performance", "track proccessed files in an S3 bucket", "perform Glue job" and etc. The components can be found under connected-ai / kubeflow-components repository. If you need some custom component for your use case, you can create one by following Kubeflow's comprehensive tutorials. You can also add it to the repostitory, so that other with similar problem can use it.
The official Kubeflow pipelines repository also offers a variety of commonly used components such as AWS Sagemaker components.
Overview of example pipeline
The pipeline generated by CD4ML template in the previous section includes thes steps:
- Data transformation
- Training
- Model Evaluation
When browsing it in the Kubeflow UI by navigating to
- ROW: https://cd4ml.{{your_pipeline_region}}.{{your_product_env}}.{{your_dedicated_cluster}}.connected.bmw
- CN: https://cd4ml.{{your_pipeline_region}}.{{your_product_env}}.{{your_dedicated_cluster}}.cv.bmw.com.cn
you should see this diagram:
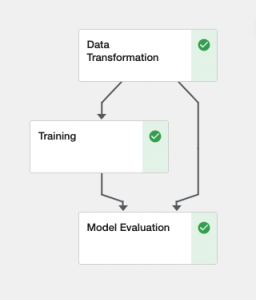
As you can see the preceeding pipeline steps are dependent on the previous one. The "Model Evaluation" step will be executed only when the "Data Transformation" and "Training" successfully pass. If an error occurs in the preliminary steps, the execution of the preceeding steps will terminated and the pipeline will fail.
In practice, the entire pipeline is defined under your_project_name/ml_pipeline/pipeline.py by importing the lightway components as:
Example pipeline steps
from ml_pipeline.components.data_transformation import data_transformation
from ml_pipeline.components.model_evaluation import model_evaluation
from ml_pipeline.components.training import training

@pipeline(name=pipeline_title)
def ml_pipeline():
    data_transformation_step = data_transformation(
        data_s3_path=f"s3://{account.data_bucket_name}/abalone.csv",
        output_s3_key=run_id_path,
    )
    data_transformation_step.set_display_name("Data Transformation")
    set_max_cache_staleness(data_transformation_step)

    training_step = training(
        data_s3_path=data_transformation_step.outputs["train_data_s3_path"],
        output_s3_key=run_id_path,
    )
    training_step.set_display_name("Training")
    set_max_cache_staleness(training_step)

    model_evaluation_step = model_evaluation(
        data_s3_path=data_transformation_step.outputs["test_data_s3_path"],
        model_s3_path=training_step.output,
    )
    model_evaluation_step.set_display_name("Model Evaluation")
    set_max_cache_staleness(model_evaluation_step)
Deploying your pipeline
The Connected AI Platform provides flexible deployment options for your ML pipelines:
- Visual Studio Code (VS Code) server: Deploy directly from a Kubeflow notebook instance
- GitHub Actions: Automated deployment as part of CI/CD pipelines
Deploying from VS Code Server
The recommended approach is to deploy pipelines from within a VS Code Server instance running on Kubeflow. This ensures compatibility and eliminates environment-related issues.
When you use the CD4ML template, the CAIP-SDK is automatically included as a dependency. The SDK provides comprehensive functionality for:
- S3 upload and data management
- Configuration loading and management
- Pipeline creation and deployment
- Kubeflow integration
To deploy your pipeline from VS Code Server, use the following command:
caip pipeline run
This command will:
- Generate a
.zipfile withpipeline.yamlcontaining Kubeflow specifications - Create or update the pipeline in Kubeflow
- Trigger a pipeline run
Upon successful execution, you'll see output similar to:
INFO:root:Uploaded pipeline - https://cd4ml.eu-central-1.test.conn-ai.connected.bmw/_/pipeline/?ns=ai-hworld#/pipelines/details/747cd867-359c-47d8-b5a3-b0a64eed0bfe
INFO:root:Triggered pipeline run - https://cd4ml.eu-central-1.test.conn-ai.connected.bmw/_/pipeline/?ns=ai-hworld#/runs/details/2ba9f7db-50aa-4018-8c1d-50fa183db27f
These URLs provide direct access to:
- Pipeline Details: View the pipeline definition and configuration
- Run Status: Monitor the execution progress and results
The URLs will reflect your specific environment (region, cluster, and namespace).
Deploying from GitHub Actions
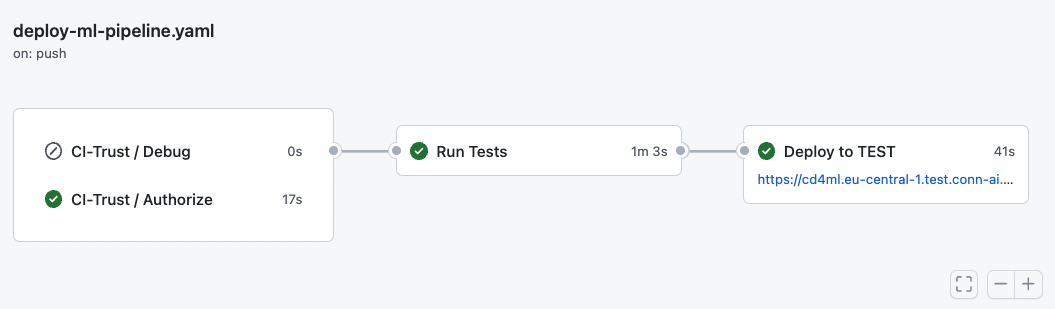
Since GitHub Actions are automated workflow, the pipeline will be deployment is specified as a step in the configuration file. Once all the proceeding steps (e.g. scanning for security vulnerabilities, linting, testing, and etc.) are passed, then pipeline will get deployed.
Advanced Features
Memory and Compute Available
ML workloads, such as training models or serving them, can be resource-intensive. Configuring resources ensures that these tasks can efficiently run in parallel without disrupting each other. Kubernetes with Kubeflow which powers your Connected AI pipelines allows configuring pod (~ pipeline step) requests and limits for memory (RAM) and compute (CPUs). This guide details this Configuration and resource Quotas.
Configuration
Requests Vs. Limits
Requests is the amount of CPU or RAM guaranteed to be available for a pod (technically, a container with your business logic). When a pod is created, the cluster scheduler finds a node that can fulfill the requested resource allocation.
Limits, on the other hand, are maximum allowed resources. Setting limits protects your cluster from potential resource exhaustion (e.g., pod deletions) due to resource usage spikes. If a container tries to use more than the specified limit, Kubernetes will generally throttle the container (for CPU) or terminate the container (for RAM).
While it might be tempting to only set resource requests and limits if your pod experiences failures, doing so preemptively is beneficial for overall cluster health, performance, and cost-efficiency. You may set the pipeline step pod requests and limits as follows:
pipeline.py
training_step = (
    training(…)
    .set_memory_request("600M") # based on average usage + buffer
    .set_memory_limit("1200M") # based on peak usage + buffer
    .set_cpu_request("700m") # based on average usage + buffer
    .set_cpu_limit("1400m") # based on peak usage + buffer
)
In the above, training is defined here.
We recommend starting with relatively high values for the above and then adjusting them to the average usage plus buffer for requests and the peak usage plus buffer to limits.
When defining memory requests and limits in Kubernetes and Kubeflow, you can use the following:
Binary Units
- Ki (kibibyte): 1 Ki = 1024 bytes
- Mi (mebibyte): 1 Mi = 1024 Ki = 1,048,576 bytes
- Gi (gibibyte): 1 Gi = 1024 Mi = 1,073,741,824 bytes
Decimal Units
- K (kilobyte): 1 K = 1000 bytes
- M (megabyte): 1 M = 1000 K = 1 mln bytes
- G (gigabyte): 1 G = 1000 M = 1 bln bytes
When defining compute requests and limits, use the following:
- 1: Represents one full CPU core
- m (millicores): Represents one-thousandth of a CPU core. For example, "500m" means the container is allocated 500 millicores ~ 0.5 of a CPU core.
Best Practice
Your pipeline runs might result in accidental pod deletions if requests and limits are too high. If it happens, we recommend parallel computing with Spark. Refer to this example to use in-cluster Spark in your Connected AI pipeline runs.
Quotas
When configuring resource requests and limits as described above, it's important to account for the size of the underlying nodes and the portion of resources reserved for the Connected AI and Orbit platform resources. Under the hood, we use AWS EC2 instances of pre-selected types.
Below are the recommended values based on the Orbit EC2 node sizes we have successfully tested, though they may vary depending on the cluster load.
Large (Default)
- Available 27 GBs (out of 32 GBs) RAM
- Available 5 CPUs (out of 8 CPUs)
Small
- Available ~ 6.75 GBs (out of 8 GBs) RAM
- Available ~1.25 CPU (out of 2 CPUs)
XLarge
- Available ~ 54 GBs (out of 64 GBs) RAM
- Available ~12 CPUs (out of 16 CPUs)
Best Practice
It is not recommended to set requests and limits close to the resource quotas. Doing so reduces Kubernetes' scheduling flexibility, potentially leading to inefficient resource use, as Kubernetes may need to provision a separate node for each pipeline step.
Pipeline Steps Code Optimization
In-cluster Debugging
When creating pipelines, if a step exceeds the best practice limit, it will fail. The exception results in no logs either of a pipeline step or the entire pipeline/workflow definition in your Kubeflow UI pipeline run.
As usually the code you define for your pipeline step isn't pre-packaged as a Docker image, it gets pickled and included in the step pod definition, which may create issues for Kubernetes to handle this code as a pickled string in a YAML.
Below, we outline solutions that help you achieve better code structure and ultimately not face this limit. These suggestions are highly sensitive to your pipeline logic.
Reduce Code per Step
To reduce the argument list per step, you may:
- Separate out pipeline steps in smaller steps
- Reduce the total number of modules to be imported by creating a separate module (i.e., Python file) and transfer all the relevant functions which you are using into that single module and import it. However, keep in mind that including too many classes needed by different modules and importing and pickling all of them may again lead to the code size per step being too large to handle.
Define Your Pipeline via Multiple Functions
Another approach to reduce the code size is to define your pipeline via multiple functions. Specifically, your main pipeline function gets decorated and calls functions that add more steps to your pipeline:
from kfp.dsl import pipeline

def ml_pipeline_add():
    step_2 = step_2_op()

@pipeline
def ml_pipeline():
   step_1 = step_1_op()

   ml_pipeline_add()
This way, the code size limit applies to each function. It also helps you have a better code structure.
Build Base Image
Yet another way is to create a Docker image with code and scripts that don't change between pipeline runs, and, therefore don't need to get pickled. For that you may use the CAIP SDK abstraction (e.g., the usage is here) for building Docker images and pushing them to Elastic Container Registry (ECR). Afterward, you need to specify the pushed image with tag as the base image for your pipeline step(s), e.g., as is done here.
This approach addresses the overall pipeline/workflow definition.
Accessing Secrets from Pipelines
There are scenarios where you need to access credentials stored in secrets from your Kubeflow pipelines. This tutorial outlines two alternative approaches: Kubernetes secrets and AWS Secrets Manager.
TLDR: Both options work BUT
- Option 1 only works with Kubeflow Python Native components
- Option 2 is only possible with custom permissions and with the help of the account admin who can create secrets in the AWS Secrets Manager
Option 1: Store secret as k8s secret and access it from Kubeflow native component
The Kubernetes native way would be to store the credentials in a Kubernetes secret and then directly access it from the Kubeflow pipeline (only works with Kubeflow native Python components).
Create a secret
A Kubernetes secret can be created in different ways:
- Assume caip-developer role for your cluster and namespace
- Create new file e.g.
kubernetes_secret.yaml:
apiVersion: v1
kind: Secret
metadata:
  name: example-secrets
data:
  DB_PASSWORD: c3VwZXItc2VjcmV0LXBhc3N3b3Jk
  DB_USER: ZGVtby1hcHAx
The DB_PASSWORD and DB_USER should be base64 encoded. For encoding the passwords you can run the following command in the terminal:
echo -n 'super-secret-password' | base64
- Apply file with
kubectl apply -n <your_namespace> -f kubernetes_secret.yaml - Confirm that the secret has been created by running:
kubectl get secret example-secrets -n <YOUR_NAMESPACE> -o yaml
For more information on how to create Kubernetes secrets have a look at the official documentation.
Retrieving a secret
The following code snippet creates a component that retrieves the Kubernetes secret:
from kfp.components import func_to_container_op

def access_k8s_secret():
    from kubernetes import client, config
    import base64

    config.load_incluster_config()
    v1 = client.CoreV1Api()

    # Gets the base64 encoded secret values
    sec = v1.read_namespaced_secret(<YOUR_SECRETNAME>, <YOUR_NAMESPACE>).data

    # If you need a specific value of the secret decoded
    secret_decoded = base64.b64decode(sec.get(<SECRET_VALUE>)).decode('utf-8')

access_k8s_secret_op = func_to_container_op(
    func=access_k8s_secret,
    base_image="python:3.10",
    packages_to_install=[
        "kubernetes",
    ],
)
Option 2: Store secret in AWS secrets manager and access it from Glue job
If you need to access credentials from a Glue job, then the easiest way is to store the credentials as a secret in the AWS Secrets Manager.
Orbit does not provide any Roles & Rights to create new secrets, therefore this step can only be done with fpc/UserFull permissions (please contact your account admin).
After the secret was created, AWS provides sample code on how the secret can be accessed (e.g., from within Glue job).
As a last step the secret ARN needs to be copied and an additional permission to retrieve the secret needs to be added to the Glue-execution role. Since the new Roles & Rights concept is not yet released this step can not be done by use case teams only be done as temporary additions by the platform team.
Extended permission on execution role to retrieve secret value:
{
    "Version": "2012-10-17",
    "Statement": [
        {
            "Sid": "VisualEditor0",
            "Effect": "Allow",
            "Action": "secretsmanager:GetSecretValue",
            "Resource": "arn:aws:secretsmanager:eu-central-1:493239015811:secret:conn-ai/ai/example-test-secret-ERmT4O"
        }
    ]
}
CAIP Kubeflow Components
Beyond defining simple inline methods, you can package your custom code into a compiled component file (a YAML definition). Once compiled, these components become modular building blocks that can be easily shared and reused across different pipelines.
Pre-built CAIP SDK Components
Leveraging this exact packaging concept, CAIP Kubeflow Components provides a suite of out-of-the-box Kubeflow components for common operations, including:
- AWS Glue Jobs (ETL pipeline integration): Using this component, you can create, update, and run an AWS Glue job from your Kubeflow pipeline.
- EMR Jobs (Big data processing): This component helps you to do computation-heavy ETL (extract, transform, & load) from your pipeline.
- Teams Messenger Notifier: The Teams Messenger is a component designed to send notifications to your Microsoft Teams channel.
- Run Metrics (Experiment tracking and evaluation): This component acts as a bridge, enabling short-lived Kubeflow pipeline steps to reliably send their metrics to a persistent Prometheus Push Gateway.
Resources: You can find and explore these pre-built components in the CAIP Kubeflow Components Repository.
Advanced Pipelines
The previous section discusses Kubeflow Pipelines, components, runs, and experiments. While in most cases pure Python and Kubeflow community examples suffice, there are scenarios where you need to process larger data, keep track of processed and unprocessed files in your S3 buckets, monitor your model and data quality.
Community Examples Available
The examples presented on this page complement the publicly available ones from Kubeflow community (here).
The Connected AI Platform wraps such scenarios in further example pipelines:
| Pipeline | Description | Can you deploy it to your Connected AI cluster out of the box? |
|---|---|---|
| Big Data Processing | ||
| Spark (EMR In-cluster) | Shows you how to run Spark jobs in your Connected AI cluster. The Kubeflow component we use abstracts away interactions with AWS for spinning the job. It's similar to the Glue component that you might have interacted with. | ⚠️ Enable EMR via your product.yaml, per namespace. Refer to this example. |
| Glue Crawler Example | Shows how to create a Glue crawler from Kubeflow, which is primarily used to populate the AWS Glue Data Catalog with tables. A crawler can crawl multiple data stores in a single run. Upon completion, the crawler creates or updates one or more tables in your Data Catalog. | ✅ |
| Glue Example | Here, we show how to spin Glue jobs from Kubeflow. The script gets uploaded to S3 together with updating the pipeline in Kubeflow. | ✅ |
| Pipeline per Partition | Shows how to apply the same pipeline structure to partitions when you have different execution scripts per partition (e.g., in AWS Glue). To facilitate this, this example defines custom CLI arguments to call your pipeline module, on top of the required by CAIP SDK. | ✅ |
| Steps on Batches | This example has two Kubeflow Pipelines Definitions. They show how to process multiple items from a previous pipeline step (eg, a Glue job) in parallel ( eg, transform and predict per partition). The second illustrates the opposite operation. | ✅ |
| Run Tests in Cluster | Demonstrates how to run tests, e.g., Spark logic for Glue jobs in your Connected AI cluster. The Kubeflow pipeline that spins the Glue job is provided for reference. | ✅ |
| Custom Base Image | This example shows how to create your own custom base image to be used as Kubeflow Components. | ✅ |
| Validate Big Data | Shows how to validate data using AWS Glue. You might use this example for validating big data sets, eg, from Cloud Data Hub (CDH). We suggest you use Pydeequ, a Python library developed by AWS. It natively supports Spark DataFrame--thus, it leverages Spark to apply your validation rules. It enables profiling, analysis, as well as constraint suggestion and verification. | ✅ |
| Process Vehicle Shadow Data | Shows how to process S3 files from a VS Kinesis stream. On top, these data get enriched via the VS GraphQL API. | ⚠️ Set up the Vehicle Shadow integration, and set up IAM to make sure that your pipeline (CD4ML) role is allowed to get and put object tagging |
| Observability | ||
| Data Quality & Target Drift Detection | Loads data and generates a series of reports on data quality, data drift, model regression performance, and target drift. Then selects metrics and pushes them to Prometheus. | ✅ |
| Prometheus Query | Covers how to send a query to Prometheus and output the resulting metrics as an output_artifact in Kubeflow. The prometheus-api-client package is used to establish a connection to Prometheus, to extract its metrics. | ✅ |
| CDLS Logging | Shows how to annotate your pods to aggregate your logs in the CDLS system to query and filter them using Kibana | ⚠️ Need to request a CDLS contract following this guide. |
| Experiment Tracking | Shows how to apply calculation and output for scalar metrics and to build a pipeline step to visualize a confusion matrix. | ✅ |
| Kubeflow Visualisation | This example shows how to output different visualisations and metrics from within pipelines. | ✅ |
| Model Training | ||
| Hyperparameter Tuning (Beta) | Shows how to tune hyperparameters with Katib. Outputs a graph showing the accuracy of the model as the various ML framework parameters get reiterated in Katib experiments. | ❌ Can only be used by teams covered by our PoC for Katib. Reach out to get involved. |
| SageMaker | A training and data processing pipeline on SageMaker. The training pipeline performs an ML classification on the Abalone dataset using PyTorch. | ✅ |
| GPU Example | Covers how to run a PyTorch script on a GPU node | ⚠️ requires enabling GPU nodes for your cluster, reach out to us to get this set up |
| Stage a Model | This example shows how to stage a model after training. It uses AWS S3 object tagging. Upon training, the model gets evaluated to then tag its object in S3 with mean squared error (MSE). If this model's MSE is lower than the staged one's, it replaces the staged in S3. | ⚠️ Set up IAM to make sure that your pipeline (CD4ML) role is allowed to get and put object tagging |
| Model Serving | ||
| MLFlow to Endpoint Example | Shows how to use MLflow on top of Kubeflow. Refer to this guide to get informed about how MLflow could complement Kubeflow and when Kubeflow is sufficient. | ⚠️ Need to enable MLFlow in your product.yaml |
| Serving with Custom Image | Shows how to expose a ML model in a custom Docker image for live inference requests via KServe. | ⚠️ Need to enable KServe in your product.yaml |
| Live Serving | Shows how to expose and deploy an inference endpoint to BMW intranet using KServe and send an inference request to it. | ⚠️ Need to enable KServe in your product.yaml |
| Batch Inference | Loads in raw data and applies feature engineering before applying a trained model to the transformed data to demonstrate batch inference. Runs on a schedule using a cron expression. | ✅ |
| Canary Release | This example shows how to do canary release when deploying your model and exposing an inference endpoint using Kserve | ✅ |
| Utils | ||
| Custom CLI Parameter | Shows you how to add your own parameters to the CAIP SDK CLI parser. Uses the get_parser() function from the CLI sub-module. | ✅ |
| Modules to Capture | Shows how to use the modules_to_capture attribute of func_to_container_op of kfp.components. This example addresses the challenge of how to split your pipeline logic into unit modules. | ✅ |
| With Another Python Version | This example shows how to deploy your pipeline using a Python version other than the default 3.8 in GitHub runners (CI/CD). This example uses pyenv to install Python 3.11 and can be extended to any other version. | ✅ |
| Teams Messenger | The purpose of this example is to showcase the integration of Kubeflow Pipelines with MS Teams for efficient collaboration and communication within a workflow. | ✅ |