Getting Started
This guide walks you through the first-time user experience on the CAIP Web Portal — from your initial login to accessing a fully configured Space.
First-Time User
If you are visiting the portal for the first time and have not been assigned to any Space, the landing page will provide an overview of the CAIP platform. However, you will not be able to access any of its features. You can view the available features on the webpage, but they will appear disabled.
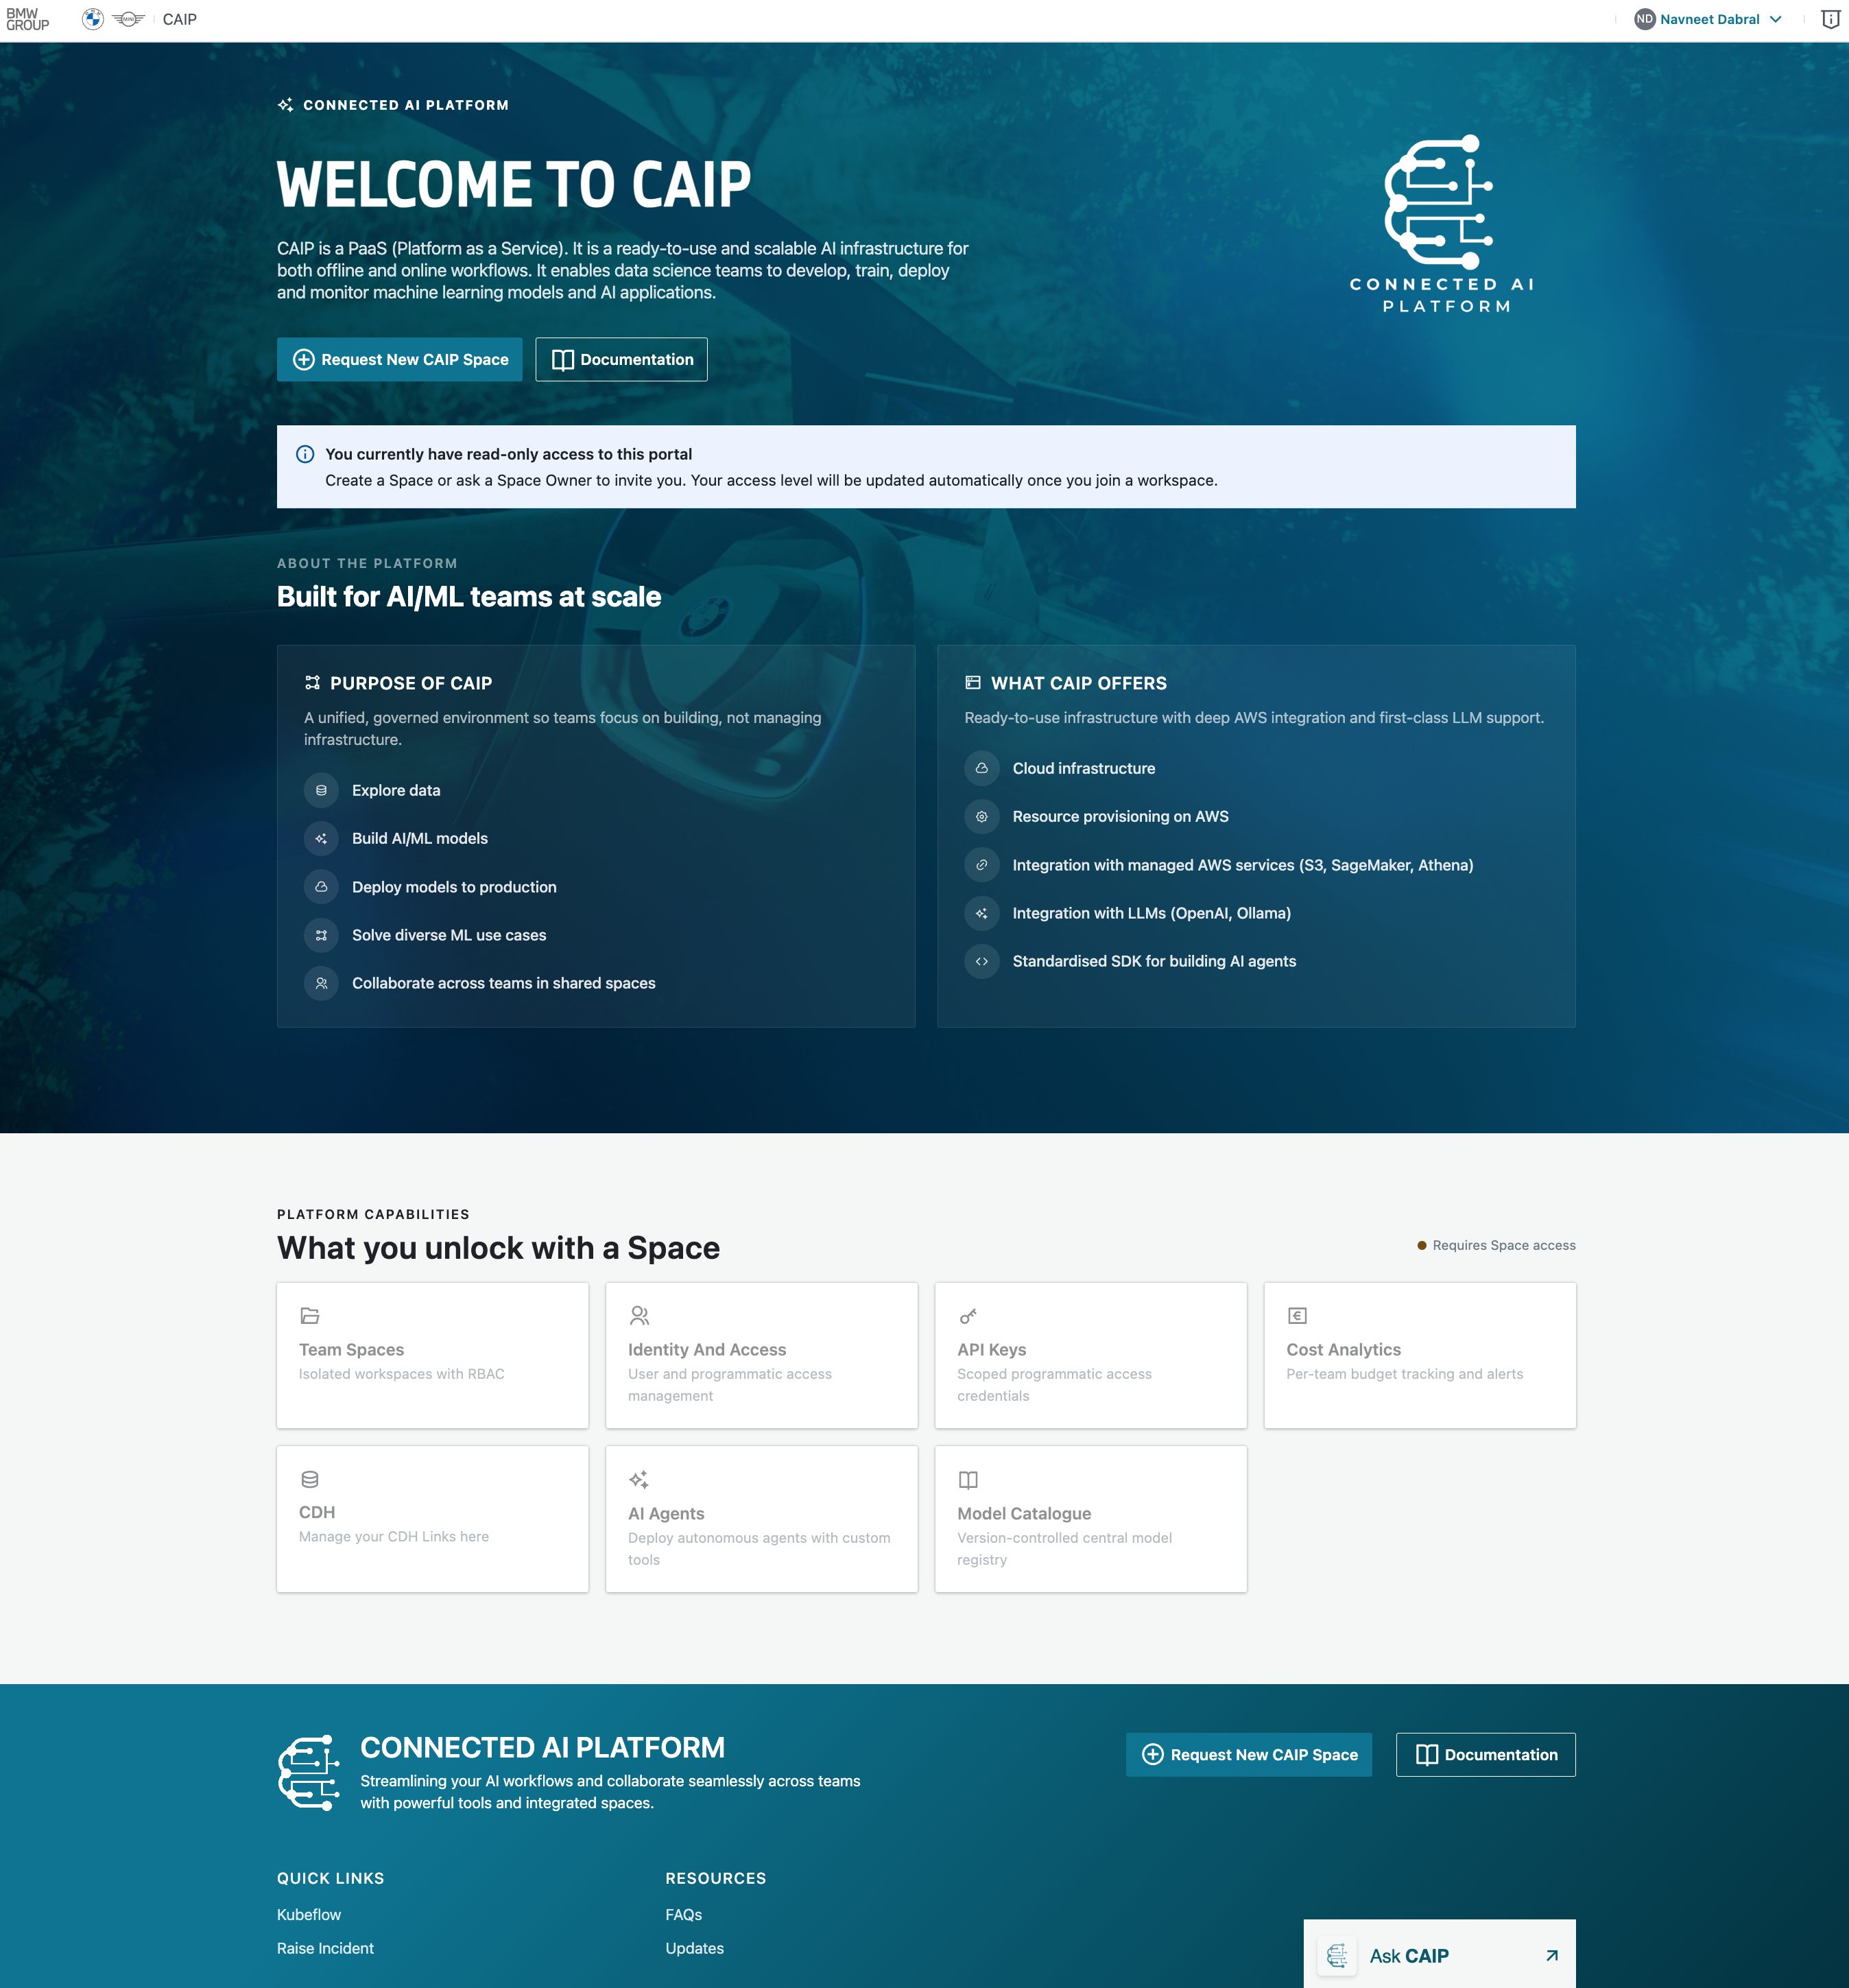 First-Time User Landing Page
You currently have no space-scoped access in the portal. Create a Space or ask a Space Owner to add you. Your access level will be updated automatically once you join a Space.
These features can be unlocked once you either create a Space or become a member of an existing Space. A detailed explanation of each feature is provided in the Portal Features section.
Raise a Service Request for a New CAIP Space
The following steps explain how to raise a request for a new CAIP Space via the My BMW IT Portal.
Use the Onboarding Request guide to start the request flow.
Today, space creation is handled via the My BMW IT Portal Service Request flow. Direct in-portal request creation is planned and will be available soon.
Step 1 — Start the Request
Raise a request for a new CAIP Space by selecting the "Request New CAIP space" option available in the Hero Banner. This will redirect you to the My BMW IT Portal.
Step 2 — Fill in the Details
In the My BMW IT Portal, enter the following details:
| Field | Rules | Example |
|---|---|---|
| Space ID | 1–9 characters, lowercase letters, digits, and hyphens only. Must start and end with a letter or digit. The backend generates a unique ID by prepending an incremental uc-XXX- prefix to the value you enter. | You enter data-map → final ID: uc-123-data-map |
| Space Name | The display name for your Space. 1–32 characters. Letters, digits, spaces, underscores, and hyphens allowed. | Data Map Project, BMW M5 Analytics |
| App ID | 1–7 digits. Displayed with an APP- prefix automatically. See how to create an App ID. | 1234567 → APP-1234567 |
| Description | 10–260 words. Must contain at least one alphanumeric character. | A brief description of your project or use case. |
Once submitted, your request will be created in the system.
Step 3 — Wait for Approval
The responsible team will review and validate your request details. Once the verification process is complete, a Space will be assigned to you. After you are assigned to a Space, you will be able to unlock and access the CAIP offerings and use them effectively.
The turnaround time for processing the request is 3 business days.
Create a New CAIP Space (from Portal)
You will soon be able to create Spaces directly from the portal without raising a Service Request. Stay tuned for updates!
Once this feature is released, you will be able to click the "New CAIP Space" button on the welcome page and submit a request directly from the portal.
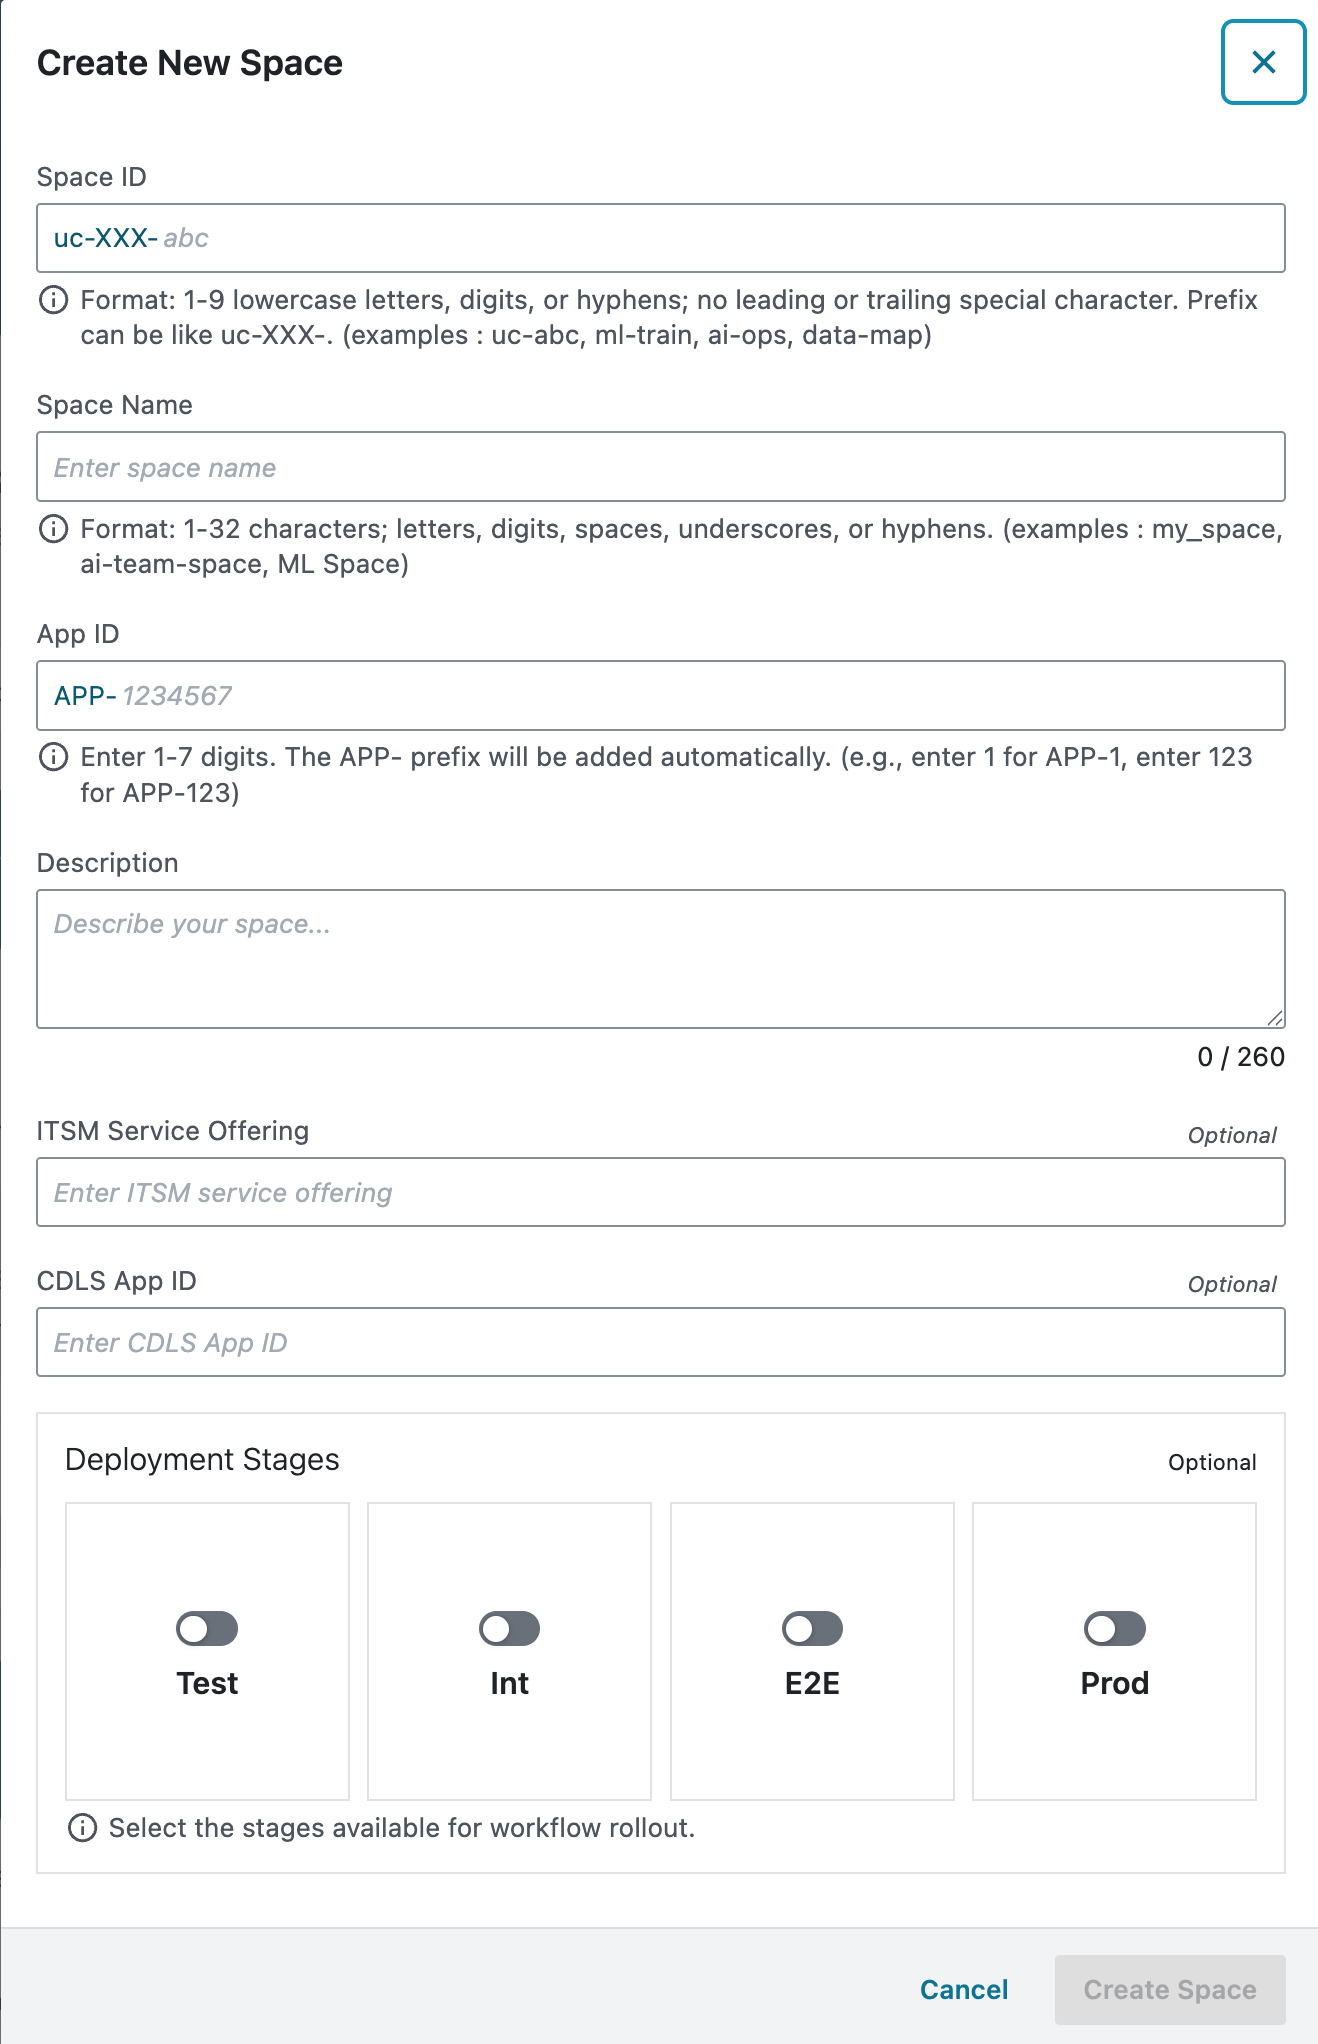
Create New Space Form
Required Fields
| Field | Rules | Example |
|---|---|---|
| Space ID | 1–9 characters, lowercase letters, digits, and hyphens only. Must start and end with a letter or digit. The backend generates a unique ID by prepending an incremental uc-XXX- prefix to the value you enter. | You enter data-map → final ID: uc-123-data-map |
| Space Name | The display name for your Space. 1–32 characters. Letters, digits, spaces, underscores, and hyphens allowed. | Data Map Project, BMW M5 Analytics |
| App ID | 1–7 digits. Displayed with an APP- prefix automatically. See how to create an App ID. | 1234567 → APP-1234567 |
| Description | 10–260 words. Must contain at least one alphanumeric character. | A brief description of your project or use case. |
Optional Fields
| Field | Rules |
|---|---|
| ITSM Service Offering | 3–100 characters if provided. |
| CDLS App ID | Up to 50 characters. |
| Deployment Stages | Toggle switches for Test, Int, E2E, and Prod. Controls which environments are available for workflow rollout. |
Submission
Once all required fields are filled and validated, submit the request from the portal. After provisioning is completed, you will be assigned as the Space Owner automatically and the Space will appear in your dashboard.
Get Added to an Existing CAIP Space
If a CAIP Space already exists and you need access, you do not need to create a new one. Instead, follow these steps:
- Contact the Space Owner — Reach out to the Owner of the Space you want to join. If you are unsure who the Owner is, ask your team lead or project manager.
- Space Owner adds you — The Space Owner can add you as a Member directly through the Identity & Access section of the portal.
- Access granted — Once added, your access level will be updated automatically and you will see the Space in your portal dashboard.
For more details about user roles and permissions, see the Identity & Access page.